Itiwit Packraft 100 Review

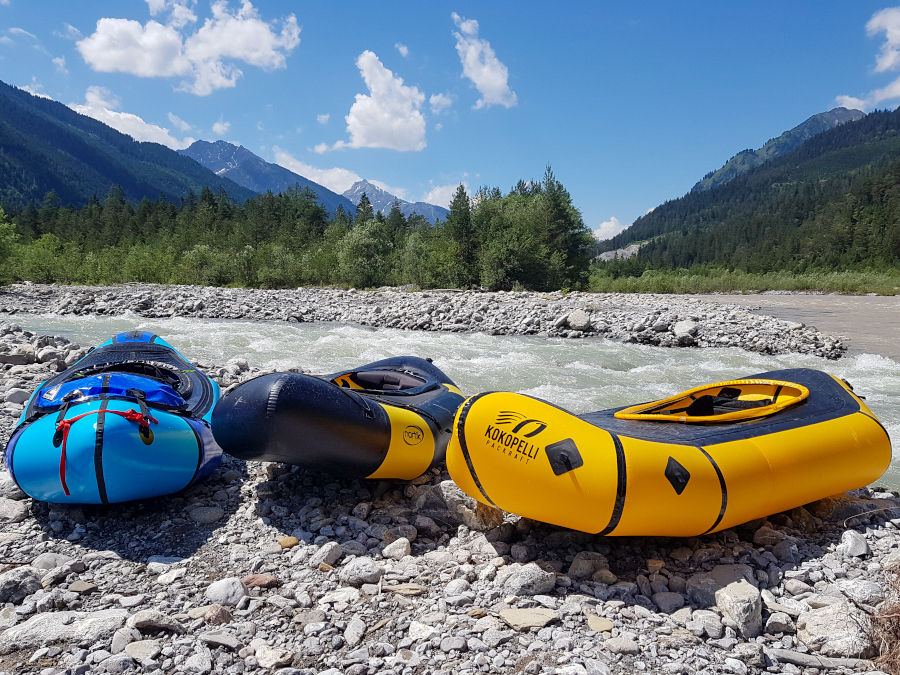
Decathlon entered the packrafting segment with the Itiwit Packraft 500 at the end of 2021. Now, with the Itiwit Packraft 100, another model has appeared, which is aimed more at beginners, both in terms of price and equipment. In this review you will find out what the new Packraft from Decathlon has to offer and what experience we have already gained with this packraft.

itiwit-packraft-100

Technical Specs

Max. paddlers:
Length:
Width:
Capacity:
Packed size:
Material:

1
205 cm | 6’7”
95 cm | 3’1″
110 kg | 242.5 lbs
25 x 40 cm | 8” x 1’3”
TPU/PU coated nylon

Weight (Boat):
Weight (Complete):
Produced in:

1.8 kg | 4 lbs
2.0 kg | 4.4 lbs
China

Which model has been reviewed?

Itiwit Packraft 100 from 2022

How did we organize the review?

We have purchased the Itiwit Packraft 100 ourselves.

How intensively has the product been tested?

low

high 1 bar = 1-3 km paddled (first impressions)
2 bars = min. 1 day/ 2 half-day tours
3 bars = min. 4 tours
4 bars = min. 8 tours
5 bars = min. 12 tours (very intense)

Where have we tested the product?

Whitewater

Calm rivers

Lakes

First impressions and assembly

The Packraft is supplied with a transport bag, which not only makes a robust impression, but also fulfills several functions at once: transport bag, air pump and dry bag during the tour. Itiwit has already applied this concept to the Adventure 500, which we really like.

The roll closure allows the Packraft to be stowed in a space-saving manner. Excess air that remains in the packraft when the closure is rolled up can then be released via the valve on the front of the bag. This results in a securely packed Packraft in a maximally compressed state.

itiwit ultralite packraft decathlon
Transport bag, which also serves as a inflation and dry bag

Besides the packraft, the transport bag contains the seat, the pump hose and some self-adhesive repair patches. None of this is additionally packed in PVC film or a bag. We like this quite a bit because it means there is no unnecessary packaging waste.

The Packrafts assembly instructions are also sewn into the upper edge of the transport bag, which serves as a handy quick reference guide for on the go in addition to the actual instruction manual.

decathlon itiwit packraft 100 accessories
The transport bag contains the packraft, the seat and hose and a repair kit
itiwit packraft 100 folded pack size
Packraft rolled up
itiwit packraft 100 manual
Brief instructions on the transport bag

Decathlon advertises the light weight of the packraft and states a total weight of 2kg. Since the weight plays an important role in packrafting, we weighed the individual parts. The packraft itself weighs 1630g, the seat 300g, the pump bag 290g and the pump tube 60g. This gives a total weight of 2280 g and is thus slightly above the stated total weight 2 kg on the part of Decathlon. But even about 2.3 kg total weight is not much for a packraft. However, the pump bag with pump hose weighs more than usual inflation bags of Packrafts from other manufacturers. Due to the multifunctionality of the pump bag and the easy handling as a pump, it’s a real benefit.

The assembly of the Packraft is very simple and thanks to the ingenious pump bag, it is even easier for beginners with the Itiwit Packraft. First you have to unfold the Packraft. It is common for inflatable boats to have a compression strap around the boat to prevent it from rolling out on its own and to make it easier to stow away at the end. With the Itiwit Packraft, no additional compression strap was used, but the strap that is later used for seat attachment is also used as a compression strap. This is a small detail, but pretty well thought out. The weight saved is negligible. The real advantage of this implementation is that you cannot lose the strap, because it is firmly attached to the boat.

itiwit packraft assembly
Assembly of the packraft with the pump bag

Usually a packraft is inflated with a simple inflation bag, because this is very light and compact. An air pump would be impractical for a packraft, because it would quickly exceed the pack size of the packraft. The disadvantage of a inflation bag is only that the inflation with that requires some practice and habit. Thus, beginners often find it somewhat difficult to efficiently fill a packraft with air using a inflation bag.

Itiwit has come up with a good compromise between an inflation bag and an air pump for its packrafts. The transport bag serves as a pump bag during assembly. To do this, you open the valve at the bottom of the transport bag and attach the supplied pump hose. The other end of the pump hose is attached to the valve of the packraft.

Thanks to the air hose, the pump bag can be placed on the ground and used like a hand pump. You simply lean on the air-filled pump sack and pump air into the packraft. You roll the pump bag a little bit again and again, so that a sufficiently high air pressure is generated in the pump bag, which you can push in the packraft.

itiwit packraft 100 valve
Also, the valve makes a high-quality impression

You repeat this pumping process several times, more precisely according to the manual “10 – 12 times until the pump bag no longer allows it”. Usually with Packrafts (also with such Boston valves) you generate the final air pressure with your mouth or with a separate small hand pump. We use the Itiwit pump bag for this and apply small jerky impacts to the pump bag to get the air tube of the packraft nice and tight. So, from our point of view, it is not absolutely necessary to create the final air pressure with the mouth or with a small separate hand pump, as with other packraft. Here you should be careful not to create overpressure, because otherwise material damage can occur.

We therefore recommend that you create the final air pressure with your mouth or with your own puff during the first set-up, because this way you will not create overpressure. Then reach into the air tube to get a feeling of how the packraft feels with the correct air pressure. You can use this firmness as a guide later on when you want to create the final air pressure with the pump bag.

The bottom of the pump bag is much sturdier than a common inflation bag of many other packrafts, so you can put it on the ground without damaging it. Both the valve of the packraft and the seat cushion are high quality. Both valves have a check valve, so that the air can not escape when inflating.

itiwit packraft 100 seat
The seat is attached to the boat with a strap

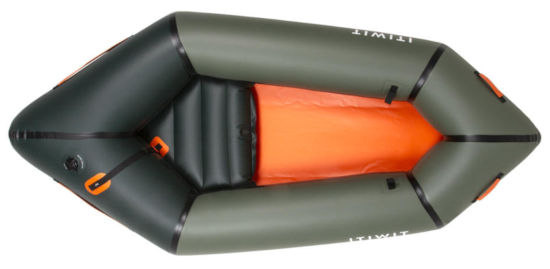
After inflating the packraft and seat cushion (by mouth or 1-2 pushes with the pump bag), position the seat in the boat. When the packraft and seat are tightly inflated, the seat cushion sits fairly tightly in the packraft. Attach the seat to the boat via a loop on the bottom of the seat using the strap. Make sure you pull the strap tight so that the seat does not slip while paddling.

Compared to many other packrafts, the seat consists only of a seat cushion and comes without a backrest. Because the seat cushion is placed so far back in the interior of the boat, you can lean against the tube. Because the Packraft does not have an adjustable backrest, you have to take into account that the seat position cannot be adjusted individually. You can find out how well this works in practice and how comfortable the seat is in the section on experiences on the water.

itiwit packraft 100 seat fixed
The air tube of the packraft functions as a backrest

In terms of workmanship, the Itiwit Packraft 100 makes a very good impression for an entry-level model. You don’t have to make any compromise compared to the higher priced Itiwit Packraft Adventure 500. The boat is at least as well-made as the Itiwit Packraft Adventure 500. We could not find any weak points or flaws in the workmanship of our specimen. The material of the boat’s skin also feels high-quality and robust and rounds off the high-quality first impression of the Packraft.

The packraft itself is made of a coated nylon fabric. The fabric has a thickness of 420d (= denier) in the bottom and 210d in the side tube. These are typical values for packrafts in this segment. The outside of the side tube and the outside and inside of the bottom are coated with TPU (thermoplastic polyurethane), which has a high abrasion resistance and is also used in other brands of Packraft.

The inside of the side tube, which is not accessible, is coated with PU. If deeper scratches damage the outer coating, the tube is still waterproof and airtight due to the second inner coating and does not need to be patched. However, other manufacturers (e.g. Anfibio, MRS, Alpacka) do without this inner coating in order to preserve the elasticity of the carrier material (which is made of nylon or polyester) and thus achieve a higher tear resistance of the material.

decathlon ultralite itiwit packraft 100
Both the material and the workmanship of the Packraft are convincing.

On some packrafts, it is common for the underside of the bottom to overlap the side tube to further protect it from damage in the event of grounding. This concept is common practice, especially with packrafts for whitewater use. However, since the Itiwit Packraft 100 falls more into the category of ultralight packrafts, it is understandable that Decathlon has dispensed with it for this model.

decathlon itiwit packraft 100 review material
Underside of bottom of the Itiwit Packraft 100

Packrafts are available as open and closed (= with spray deck) boats. The Itiwit Packraft 100 is an open packraft. A spray deck is otherwise used as a splash guard or to attach a splash skirt to completely prevent splash water from entering and also protect the paddler from the cold. In addition, luggage can be easily attached to most spray decks. You will have to do without these advantages with the Itiwit Packraft 100. Decathlon’s Itiwit 100 is aimed primarily at beginners looking for an inexpensive packraft, and a spray deck would add to the price (as well as weight). In addition, recreational paddlers who use the packraft mainly in good weather in calmer and shallower waters can easily do without such a spray deck. Therefore, this design implementation of Decathlon is also well understandable with the Packraft.

The Packraft has a total of 4 day handles (two at the bow and two at the stern). Whether in a capsize, when pulling the Packraft to shore, when transferring two on river trips or when carrying the boat alone on the water on the shoulder, there is always a way to grip the Packraft properly. At the bow there are two additional loops to attach luggage on the bow. In connection with the two carrying handles, the luggage attachment on the bow works very well. So you can easily attach the pump bag, which also serves as a dry bag, there. Therefore, you can also transport some luggage with the Itiwit Packraft 100 without a spray deck.

decathlon itiwit packraft 100 carrying handles
Carrying handles allow easier handling of the boat

Review of the Itiwit Packraft 100 on the water

The Itiwit Packraft 100 can be carried well alone to water. To do this, you shoulder the packraft and can also use one of the carrying handles. Alternatively, you can carry the Packraft via the side tube. If you have loaded the packraft with a lot of luggage, it is still recommended to set up the packraft close to the water. If there are two of you, both people can easily carry the packraft with the carrying handles at the bow and stern.

itiwit packraft 100 tour review
The packraft can be carried to water well alone

The interior of the Itiwit Packraft does not look very spacious at first glance. We with a height of 186 and 189 cm / 6’1″ and 6’2″ can not fully stretch our legs even without shoes. Nevertheless, the Packraft offers enough space for us to sit. Due to the fact that it is cut wider and the air tube is less voluminous, you can bend your legs very well and paddle comfortably for a long time even in this position. We do not miss a footrest or thigh straps, because due to the shortness of the Packrafts you can also support yourself well on the bow of the packraft.

However, we also like to paddle with our neoprene socks in the summer. If you paddle with shoes or even hiking boots, as a tall paddler you will surely long for a bigger Packraft in the long run. Also, those who do not like to paddle with more bent legs, will find the bigger brother the Itiwit Packraft Adventure 500 more pleasing.

itiwit packraft 100 space footwell
Despite the shorter length, the packraft offers still enough space

Since the Itiwit Packraft 100 does not have a T-Zip for stowing luggage like the Itiwit Packraft Adventure 500, the luggage must be stowed on the boat itself or, if necessary, between the legs. However, this works out very well. Over the carry handles and loops on the bow, we attached our Ortlieb Gearpack 40 L and a small dry bag. While paddling this did not bother at all, because the side tube of the boat is high enough and the luggage rests on it. Thus, the legroom remains completely unrestricted.

Decathlon recommends the Itiwit 30 L backpack for the Packraft. This can not only be attached very well to the bow of the Packraft, but it is also well suited for transporting the Packraft. Inside the backpack is enough space to store the boat. With the help of the side straps, the paddle can also be attached. However, we prefer a packraft backpack with side mesh pockets for better stowage of the paddle.

itiwit packraft 100 luggage ortlieb
There is enough space for a day backpack, such the Ortlieb Gearpack 40 L
itiwit packraft 100 fixed gear backpack
Waterproof Itiwit Backpack 30 L
itiwit packraft 100 dry bag
Attachment of the backpack on the bow

The dry bag, which also serves as a inflation bag / air pump, can also be attached to the bow. However, since it can only be attached to the bow via the roll closure, it then hangs inside the boat. We find this rather impractical, as it restricts legroom. To attach it to the bow, there are no other attachment points on the dry bag. Therefore, we recommend a packraft such as the Ortlieb Gearpack or the Itiwit Backpack 30L, which has multiple attachment points to secure it to the bow using the 4 attachment loops.

Although the packraft does not have a backrest, we feel that the seating comfort is very good. So we do not miss a backrest. One finds with his lower back good hold on the air tube. The seat height is also comfortable, so that a clean paddle stroke can be performed. The seat also stays in position when paddling and does not slip.

In addition to space and seat comfort, the boat’s handling characteristics are, of course, another important aspect we’d like to discuss in more detail. Like many Packrafts, the Itiwit Packraft 100 feels most at home on gently flowing waters. With some current, you can make good progress with fewer as well as somewhat steeper paddle strokes, and paddling is fun. The maneuverability is very good due to the shortness and width and you navigate even through narrower passages or past obstacles safely and well.

On stagnant waters such as lakes, the usual weaknesses of packraft handling characteristics become apparent. Paddling too hard will cause the boat to sway left and right. Therefore, you should rather paddle steeper and less forcefully, but this leads to the fact that you naturally do not reach great speeds with the packraft. 3 – 3.5 kmh / 1.9 – 2.2 mph is a realistic average speed. Above 3.5 kmh / 2.2 mph, paddling becomes too inefficient because the packraft sways too much to the left and right. Due to its shortness, the Itiwit Packraft 100 is even more noticeable for its rather mediocre handling characteristics on such waters than the Itiwit Packraft Adventure 500, which is somewhat longer and narrower in design. Moreover, when you stop paddling, the boat drifts away immediately to the left or right. So it’s very easy to turn.

From our point of view, the most important thing when considering the driving characteristics of the Itiwit Packraft 100 are your own expectations and requirements. If I want to cover a long distance with such a compact boat and expect the best possible speeds, I will be disappointed. Most Packrafts are not designed for that (except for models like the MRS Nomad S1). However, if I primarily enjoy such a compact and lightweight boat, which I can take with me everywhere without much effort to always have the opportunity to take a small leisurely paddle tour, then I will also be very happy with the boat. Then it is also ok if the boat runs slowly on the lake. So you should use the strengths of a packraft in the first place to come to terms with the driving characteristics. Ideally, you also combine hiking with paddling to benefit from the lightness and compactness of the packraft.

itiwit packraft 100 review river tour
On easy flowing water the packraft performs well

The Itiwit Packraft 100 can also be a good choice for paddling beginners. It offers namely a high tipping stability. The voluminous air tube, the flat bottom and the high hull width ensure that it is very difficult to capsize with the Packraft. As a beginner you will feel safe right away in the packraft thanks to the high tipping stability and the good seating position.

As usual with open packrafts, splashing water gets on your clothes and into the interior on longer trips. Double paddles with drip rings provide some relief here, but keep only part of the splashing water away. So in the summer it is best to paddle barefoot or with neoprene socks and shorts. Since the seat cushion is quite high, you don’t have to worry that your buttocks will quickly get wet.

In the off-season we recommend you to wear at least rain pants or better a proper cold protection in the form of a dry suit. If you often paddle in the off-season, a packraft with a spray deck might suit you better (e.g. Anfibio Rebel 2K, nortik TrekRaft Expedition). This is because a spray deck serves as protection against splashing water, rain and cold. The Itiwit Packraft 100 cannot offer you this protection without a spray deck.

Upgrading the Itiwit Packraft with a fin

We have already mentioned that the Packraft is very easy to turn. To improve the handling characteristics, the use of one or more fins is common, especially for inflatable kayaks. For some packrafts, a fin is even offered in addition. The Itiwit Packraft 100 does not have a fin and also no fin holder to attach such a fin. However, such a fin holder can be retrofitted. For example, in the Packrafting Store there is a fin holder with fin, which can also be attached to the Itiwit Packraft.

decathlon itiwit packraft 100 fin
Attachment of a fin

Accordingly, we bought a fin with a fin holder and attached it to the underside of the packraft. In the process, the holder is permanently attached with a 2-component adhesive. Before use on the water, the fin is then simply pushed into the holder.

itiwit 100 packraft mounted fin
A fin ensures that the packraft drifts less

In terms of speed or straight-line paddling, the fin makes no noticeable difference. However, it does make a big difference in turning ease as soon as you stop paddling and drift. Without the fin, the boat drifts away to the side right away. With a fin, the boat stays on track and continues to glide straight ahead. Since you are not constantly paddling on the water, but also sometimes take small breaks to enjoy nature, drink something or take pictures, this improvement is a real plus. Therefore, we recommend the use of a fin on the packraft when the water is deep enough. Because if you are on a very shallow river, a fin is rather a hindrance, as you can get stuck with it.

Dismantling the packraft

Dismantling the Itiwit Packraft 100 is quick and easy, as usual with packrafts. You unscrew the valve from the thread of the packraft and release the air. A large part of the air already escapes by itself. The rest escapes during folding and rolling. On the seat, you open the valve. There is a push button here that you have to push in to be able to push the air out. Theoretically, you can leave the seat in the boat and fold the packraft that way. But we take it out and put it separately in the transport bag.

itiwit packraft 100 dismantle
Dismantling the packraft is easy and quick

First, fold the packraft lengthwise. Make sure that it is not wider than the transport bag. Then you can roll up the packraft from the front to the rear. Afterwards you can compress the Packraft a bit with the seat strap at the rear, which also serves as a compression belt. This will prevent the packraft from unrolling on its own.

When the packraft is folded narrowly, it fits perfectly in the carry bag along with accessories and can be compressed to the original pack size.

Sometimes you just want to transport the packraft to the car and dry and fold it at home in peace. Since the transport bag is generously sized and can be varied in size by its roll closure, it is no problem to pack the packraft even in a less well compressed state. The transport bag can be closed at the top like a conventional dry bag with roll closure and can be used as a handle for transport.

itiwit packraft folded transport
With the carrying handles the packraft can be carried well even rolled up

Strenghts and weaknesses of the Itiwit Packraft 100

The biggest strength of the Itiwit Packraft 100 is its attractive price-performance ratio, which makes packrafting affordable, especially for beginners. The easy assembly thanks to the pump bag is another aspect that beginners will surely enjoy. Although the packraft is offered cheaply by Decathlon, as a customer you do not have to make any compromises in terms of workmanship and material. We find that particularly good.

We could not find any major weaknesses in this packraft. With the name ultralight, with which Itiwit advertises, it may be noted that not the last gram of weight has been saved here by the pump/transport bag and the seat cushion to make it really as light as possible. Other manufacturers such as Anfibio optimize here even more in terms of weight.

Without a fin, the boat is also very easy to turn. As soon as you stop paddling, the boat turns to the left or right. However, this can be remedied by retrofitting a fin. Large paddlers should also consider whether the space in the boat will be sufficient for them in the long run.

Advantages

+ good workmanship + very good price-performance ratio + very easy and quick assembly due to the pump bag + pump bag can be used as transport and dry bag + sufficient carrying and safety handles available + good seating comfort + safe handling in calm waters (high tipping stability, high seating cushion, good maneuverability) + self-adhesive repair patches included

Disadvantages

– heavier than average equipment for an ultralight packraft (seat cushion and pack/pump bag) – very easy to turn without fin – when using shoes little legroom for tall paddlers in the long run – bottom of the side tube is little protected against high stresses – lack of attachment points on the pump/bladder bag

Conclusion on the Itiwit Packraft 100

With the Itiwit Packraft 100, Decathlon has brought a solid entry-level packraft onto the market, which is unparalleled at this price. Those who have so far given packrafts a wide berth due to the high investment costs, will find exactly the right model with the inexpensive Itiwit Packraft. It is focused on the essentials without big features to keep the price low. In addition, it is also light and compact with a total weight of about 2 kg / 4.4 lbs to benefit from the greatest advantages of a packraft. Precisely because Decathlon has not skimped on the material and workmanship, we can recommend the boat to the price-conscious beginner.

However, if you are willing to invest a little more in a packraft, you should definitely take a closer look at other packrafts and compare which boat best meets your requirements. For a little more money, Itiwit offers the Packraft Adventure 500, which also has a T-Zip for luggage stowage and is equipped with a front spray deck and thigh straps.

Itiwit Packraft Adventure 500 Review

The Itiwit Adventure 500 is a packraft from Decathlon that comes with interesting features and at an attractive price. Compared to traditional inflatable boats, with a packraft you can combine, for example, hiking or mountain biking with paddling. A packraft weighs no more than 4 kg (8.8 lbs) and can easily be stowed in a hiking backpack. Packrafts are in general not new, but still a niche in outdoor sports. They are pretty expensive, so many are quickly deterred from packrafting because of the high price.

Decathlon has now set itself the goal of making the entry into packrafting more affordable with the Itiwit Packraft. In this review, we would like to go into the details of the packraft, what it offers for the price and for which purposes we see the packraft well and less well suited. The review is based on our experience with many different packrafts from other manufacturers over the past few years, and the experience we have already gained with the Itiwit packraft.

itiwit-decathlon-packraft

Technical Specs

Max. paddlers:
Length:
Width:
Capacity:
Packed size:

1
230 cm | 7’5”
90 cm | 3′
125 kg | 276 lbs
40 x 30 x 25 cm |
1’3” x 1′ x 8”

Material:
Weight (Boat):
Weight (Complete)
Produced in:

TPU/PU coated nylon
2.5 kg | 5.5 lbs
3.8 kg | 8.4 lbs
China

Which model has been reviewed?

Itiwit Packraft Adventure 500 from 2021

How did we organize the review?

The Itiwit Packraft Adventure 500 was provided to us by Decathlon, a French manufacturer and retailer of sports equipment and clothing. Itiwit is Decathlon’s own brand for water sports. Our review is independent of the manufacturer or store and reflects our own opinion of the boat.

How intensively has the product been tested?

low

high 1 bar = 1-3 km paddled (first impressions)
2 bars = min. 1 day/ 2 half-day tours
3 bars = min. 4 tours
4 bars = min. 8 tours
5 bars = min. 12 tours (very intense)

Where have we tested the product?

Whitewater

Calm rivers

Lakes

Table of Contents

First impressions and assembly

The packraft comes in a robust transport bag, which is compressed with two packing straps. The pack size and weight of the packraft including accessories is comparable to other Packrafts. The packing straps are sufficiently dimensioned so that you can attach the transport bag to a hiking backpack or to the handlebar of a bike.

In addition to the packraft, the transport bag contains the seat, thigh straps, pump tube and some self-adhesive repair patches. None of this is packed in a PVC film or bag. We really like that. So there is no unnecessary trash.

The packrafts assembly instructions are also sewn into the top edge of the transport bag, which serves as a handy quick reference guide for when you’re on the go, in addition to the actual instruction manual.

itiwit packraft dimensions folded
Transport bag, which also serves as a inflation and dry bag
decathlon packraft manual
user manual attached in the bag
itiwit packraft size
The folded Itiwit packraft

In total, the complete packraft, including transport bag and accessories, weighs 3.8kg according to the manufacturer. We measured the boat and the individual parts ourselves, since weight plays a major role in packrafting.

The packraft itself weighs only 2.5 kg (5.5 lbs). However, you also need to consider the thigh straps with 400g (0.88 lbs), the seat with 400g (0.88 lbs), the transport bag with 550g (1.21 lbs) and the pump tube with 50g (0.11 lbs). The individual components are quite heavy compared to other packrafts on the market but the packraft itself is quite light. Thus, the Itiwit packraft makes it into the typical weight category of a classic packraft, which with equipment weighs around 4kg. For certain uses, you can leave the thigh straps at home and save some weight.

The transport bag is used as a inflation bag, i.e. as a kind of air pump. To do this, you need to open the valve at the bottom of the transport bag and attach the supplied pump tube. The other end of the pump tube is attached to the valve of the packraft or seat cushion. Both the valve of the packraft and the seat cushion are of high quality. Both valves have a check valve so that the air cannot escape during inflation.

itiwit packraft accessoires
Packraft with bag, seat and thigh straps

According to the manual, first the boat and then the seat is inflated and fixed in the interior. However, we find it much easier to attach and place the inflated seat in the interior before inflating the packraft.

On the bottom of the seat cushion there is a strap adjustable in length with two hook buckles (G-buckle) each end. These two hooks are used to secure the seat cushion to the floor. This prevents the seat cushion from sliding forward or folding upward at will in the boat. When the packraft and seat are tightly inflated, the seat cushion sits very firmly in the packraft.

Compared to many other Packrafts, the seat consists of only a seat cushion and has no backrest. The seat cushion is placed so far back in the interior that you can lean against the air tube. We will see how well this works in practice when we paddle it on the water.

itiwit packraft seat
Seat with fastening straps
itiwit packraft attaching seat
Attaching the seat at the floor

Before inflating the packraft you still have the possibility to stow luggage, e.g. your backpack in the air tube of the packraft. Once the packraft is inflated, you can only access the luggage inside if you let the air out of the packraft. You get access to the inside of the air tube via the waterproof and airtight zipper. Exactly such a TZIP can also be found on very high quality packrafts, which are offered as an optional feature for an extra charge. The Itiwit packraft has the TIZIP already included, which is remarkable in this price range.

However, you should be aware that a TIZIP needs care. Always make sure that it is clean and properly greased with the included silicone grease. You should also not bend the TIZIP when rolling it up.

itiwit decathlon packraft tzip
You can store luggage inside the tube
itiwit packraft tzip backpack
Storing a 40 L backpack
packraft tzip
The zipper is 50 cm long

Actually, packraft are filled with air using a lightweight inflation bag, which is screwed or plugged directly onto the valve. This works well and saves the weight and bulky pack size of an air pump. However, filling a packraft with an inflation bag takes some time getting used to for beginners at first and requires some practice to efficiently fill a packraft with air.

The Itiwit packraft is also filled with a inflation bag, but with a small difference and big effect. The pump tube allows the air-filled bag to be placed on the ground and used like a hand pump. You lean on the air-filled bag and pump air into the packraft. You roll the inflation bag a little bit every time to create a sufficiently high air pressure. The lower green part of the blowbag is much more robust than a conventional packraft inflation bag, so you can put it on the ground without getting holes in it. We have not yet experienced an easier inflation of a packraft. Here Itiwit has made the assembly of a packraft much easier with a small simple idea.

Repeat this pumping procedure several times, more precisely according to the manual “9 – 10 times until the inflation bag no longer allows it”. On the inflation bag 1.0 PSI and the packraft valve 1.5 PSI is indicate. The manual does not say how to get the last 0.5 PSI to the packraft. Usually with packrafts (even with Boston valves like this) you generate the final air pressure with your mouth or with a separate small hand pump. We use the Itiwit inflation bag for this and apply small jerky impacts to the bag to get the packraft’s air tube nice and stiff. So, from our point of view, it is not absolutely necessary to create the final air pressure with the mouth or with a small separate hand pump, as with other packrafts. Here you should be careful not to create overpressure, because otherwise material damage can occur.

We therefore recommend that you create the final air pressure with your mouth or with your own breath during the first set-up, as this will prevent you from creating overpressure. Then reach into the air tube to get a feeling of how the packraft feels with the correct air pressure. You can use this firmness as a reference for later assemblies when you want to create the final air pressure with the inflation bag.

itiwit packraft adventure 500 setup
Inflating the packraft with the inflation bag
itiwit inflation bag
Connecting the tube with the inflation bag
itiwit packraft valve
Boston valves are used

The workmanship looks really solid overall. At first glance, we can’t see any weak points. Aluminum is used instead of plastic for many components (e.g. buckles, fastening hooks, carabiners), which creates a certain high quality. The material of the boat’s skin also feels valuable as well as robust and completes the high-quality first impression of the Packraft.

The packraft itself consists of a coated nylon fabric material. The fabric has a thickness of 420d (= denier) in the bottom and 210d in the side tube (except the orange rear part of the stern, where the TIZIP is also 420d). These are common values for packrafts. Only whitewater packrafts have higher material thicknesses in the bottom, twice as strong. The outside of the side tube and the outside and inside of the bottom are coated with TPU (thermoplastic polyurethane), which has a high abrasion resistance and is also used from other packraft brands.

itiwit decathlon packraft
You only need a few minutes to assembly the packraft
itiwit packraft bottom
The workmanship of the packraft is good
itiwit packraft adventure 500 material quality
The floor does not give additional protection to the hull

The inside of the side tube, which is not accessible, is covered with a PU coating. If deeper scratches damage the outer coating, the tube is still waterproof and airtight due to the second inner coating and does not need to be patched. However, other manufacturers (e.g. Anfibio, MRS, Alpacka) do without this inner coating in order to preserve the elasticity of the base material (which is made of nylon or polyester) and thus achieve a higher tear resistance of the material.

The bottom is very cleanly and evenly attached to the side tube. Here, however, we would have liked to see the more robust bottom overlap the more sensitive side tube significantly more, thus additionally protecting the side tube (the only buoyancy of the packraft) from ground contact. This is common practice of other manufacturers to protect the side tube and at the same time the only air tube of a packraft. Only with ultralight Packrafts (e.g. Anfibio) we know that the bottom does not generously cover the side tube due to weight saving.

Instead of using the bottom material for the orange part of the air tube at the rear, it would have been better in our view to make this part from 210d and to donate an overhang of the bottom for it, which would protect the side tube.

itiwit pack carabiner thigh straps
Carabiner for fastening the thigh straps
itiwit packraft thigh straps
Thigh belts mounted in the packraft

The seating position is not variable compared to many other packrafts, because the packraft does not have an adjustable backrest. Instead, the air tube serves as a backrest. You get the necessary support in the packraft via the thigh straps.

The padded thigh straps are attached to the side tube with two carabiners and can be tightened or loosened with a strap. They are quite heavy with the carabiners for a packraft, but very high quality and sturdy. Nevertheless, the 2-point thigh straps cannot be compared to the very individually adjustable 4- or 5-point thigh straps of whitewater packrafts from Alpacka or MRS. Nevertheless, they are a good alternative to the footrest to find sufficient support while paddling.

itiwit packraft cockpit
The Itiwit Packraft is a semi-open packraft and has a front deck

Packrafts are available as open and closed (= with deck) boats. The Itiwit Packraft is a semi-open packraft. It has a front deck. Due to the raised and voluminous bow, the deck is not mainly used as a splash water protection, but to attach luggage or especially a bicycle, without disturbing the footwell.

Packrafts usually have at least four holding loops at the bow and two at the stern for attaching luggage, equipment or a bicycle. The Itiwit Packraft has five carrying handles at the bow and two large carrying handles at the stern, which can serve as holding loops or carrying handles. Thus, you have enough attachment options to securely attach luggage and equipment to the packraft.

The carrying handles are a practical alternative to the conventional holding loops. Whether in a capsize, when pulling the packraft to shore, when two people are carrying the boat on river trips or when you carry the boat alone on your shoulder, there is always a possibility to grab the packraft properly. In our model, however, the front carrying handle is quite tightly dimensioned, so that it is difficult to grab the tightly inflated Packraft.

packraft itiwit dry bag
The transport bag can be attached to the deck
decathlon packraft dry bag
Rolled up, the contents are packed waterproof
packraft carry bag
The transport bag is quickly and easily at hand

You can either store the transport bag with the tube under the deck or attach it directly to the deck. We like to use this as a dry nag, as it is waterproof when rolled up and with the valve closed, and attach it to the deck. The best way to attach it is via the packing straps on the side grab handles on the deck. This way you have a dry bag that you can access at any time without having to detach it from the deck.

Other small luggage (e.g. a waterproof dry abs with valuables) can be stowed in the footwell between your legs. There are three fastening loops on the floor.

Review of the Itiwit Packraft Adventure 500 on the water

The Packraft is easy to carry to the water. You can either shoulder the packraft or use the thigh straps as carrying handles. If you have loaded the packraft with a lot of luggage, it is still recommended to set up the packraft close to the water. If you paddle with somebody else it is then easier to carry it together to the water. You can use the carrying handles at the bow and stern.

decathlon packraft
The packraft can be carried easily over the shoulder or via the thigh straps to the water

The interior of the Itiwit packraft feels very spacious, which offers enough room for tall people. We with a height of 189 cm (6’2”), we can fully stretch out our legs, depending on our footwear. This is partly due to the fact that no space is given away by a backrest. Nevertheless, we paddle with our legs slightly bent. In this case the thigh straps serve their purpose well in order to provide sufficient support in the boat. Therefore, we recommend that you always have the thigh straps with you, as in our view they serve as a substitute for a footrest.

decathlon itiwit packraft review
The interior offers enough space even for tall people

Experience on lakes and calm rivers

Only for short tours we would omit the thigh straps, so you save almost 1/2 kg in weight. Instead, a dry bag in the footwell can then serve as a footrest, which provides sufficient support while paddling. On longer trips, we consider the thigh straps to be a useful feature.

Overall, we find the seating comfort very good despite having no backrest. We do not miss the backrest. You can find good support for your lower back on the air tube. The seat height is also very comfortable, allowing a clean paddle stroke despite the voluminous side tube. On calm waters, the seat also remained very well in position and did not slip.

In addition to space and seat comfort, driving characteristics are another important aspect we’d like to discuss in more detail. Unloaded (no luggage in the air tube or on the bow), the Itiwit packraft turns very easily, which is common for packrafts of this length without a skeg. With a steeper and less powerful paddle stroke, it can be used well for small tours on the lake or long distances on rivers with noticeable current. Especially on small rivers you will benefit from the maneuverability of the packraft.

itiwit packraft experience
On longer tours, the thigh straps are a useful addition, even on calm waters, as there is no foot brace

The packraft also offers high tipping stability. The voluminous sides and stern contribute to the fact that it has a large surface on the water. As a beginner, you will already feel safe in the packraft right away due to the high tipping stability and seating position.

As usual with open packrafts, splashing water gets on your clothes and into the interior on longer tours. Double-bladed paddles with drip rings provide can help to keep some of the splash water out.

In the summer, none of this is a problem. In the off-season, you should wear at least rain pants, and better yet, proper cold weather protection in the form of a dry suit. If you often paddle in the off-season, a packraft with a closed deck might suit you better (e.g. Anfibio Rebel 2K, nortik TrekRaft Expedition). This is because a closed deck serves as protection against splashing water, rain and cold. The Itiwit packraft with its small front deck at the bow cannot offer you this protection.

reviewing decathlon packraft
The packraft offers a high tipping stability

Bikerafting with the Itiwit packraft

We were with the Itiwit Packraft not only on several lakes in Sweden and rivers in Bavaria, but have also done a bikerafting tour. That means we did one section by bike and another section with the bike on the bow of the packraft paddling on the river.

itiwit packraft adventure 500 white water
A 13 kg mountain bike on the bow of the Itiwit Packraft

Light as well as moderate forest and gravel tails can be ridden without problems with the mountain bike and the packraft on the handlebars. The 4kg on the handlebars you hardly feel.

The transport bag of the Packraft can be very well attached to the handlebars of the bike with the two compression straps. The bag is dimensioned narrow enough so that it does not cover the brake levers and gear shift. However, the straps of the bag should be properly tightened so that the bag does not hang too far down.

If your bike has a front suspension fork, check that the bag does not touch the tire when it is compressed. If necessary, you should close the fork, pack the packraft even more compactly or put individual parts (seat, thigh straps, …) in the backpack to ensure sufficient distance from the tire.

itiwit packraft biking
The packraft on the handlebar
bikerafting decathlon
It is fastened with the compression straps
bikerafting
You can easily attach the mountain bike on this packraft

To mount the bike on the bow of the packraft, it is best to remove the front and rear wheels. The bike frame is placed on the bow first, and then the wheels are placed on the frame. To securely attach everything to the carrying handles on the top of the front deck, you will need at least four, and preferably six, packing straps.

Be sure to set up the packraft close to the water, as it is pretty unhandy to carry the packraft with the bike mounted. The best way to put the packraft with bike in the water is to reach under the deck with the palms of your hands and lift it up. Then you reach directly under the center of gravity and keep the best control when you carry it to water.

mounting bike on itiwit packraft
The bike is attached to the front of the bow
itiwit packraft with mountainbike
For this you need at least 4-6 straps

On the water, we really like the Itiwit packraft with the bike on the bow. The packraft is still nicely maneuverable and tip-resistant. You feel very safe on the water right away. Although the Packraft with its 2.3m is not longer than traditional packrafts, it feels longer inside. The front deck with its carrying handles allows the bike to be mounted nice and far forward. In combination with the seat without backrest, you get enough distance to the bike so that the bike doesn’t disturb you when paddling.

bikerafting white water
The packraft is very easy to paddle with the bike on the bow

Where luggage is usually stowed, the bike is located, which is on the bow. A dry bag can still be stowed under the deck, as the interior is very spacious. Nevertheless, we find the TIZIP at the rear really practical, especially when bikerafting. So even tours with a lot of luggage or even longer bikerafting tours are possible without any problems.

From our point of view, the Packraft with the bag, the TIZIP and front deck, among other things, has been designed specifically for bikerafting and thus delivers a really good performance.

bikerafting experience
We specially liked bikerafting with the Itiwit packraft

Whitewater paddling with the Itiwit packraft

Decathlon claims a suitability of whitewater stage 2. We paddled the Itiwit Packraft on a white water river (whitewater stage 1 and 2) and played with the one or other groundsill and went in and out of quite a bit of eddies.

Compared to calm rivers and lakes, a packraft has to cope with a lot more in white water. Groundings are inevitable in whitewater and much more frequent than in other waters. Especially if the water level is low, you don’t know the river yet or you don’t have much experience in finding the right line in whitewater. That’s why packrafts for whitewater have a generous bottom, i.e. the more robust bottom has an overhang and gives additional protection to the lower part of the side tube (which provides the air buoyancy of the packraft). This is not the case with the Itiwit Packraft. This is not a big issue. However, it has a higher risk of getting a hole in the side tube than a packraft that is designed for white water use (e.g. Mekong Pablo Whisky Bar, MRS Alligator 2S or Alapacka Expedition). 

itiwit packraft performance
Packrafting on a whitewater river

For regular paddling in whitewater stage 2, we also miss a whitewater deck or drain opening. Without this option, you have to stop and empty the boat more often. The voluminous and raised bow rides many waves well. Nevertheless, especially in white water stage 2, one or the other wave comes into the boat from the front or from the side. The front deck is too short for effective splash protection and hangs down to the interior due to the raised bow. If a wave hits the bow, it will flow into the interior.

For these reasons, we recommend the Itiwit packraft for white water stage 1 and at most for occasional use in white water stage 2. In our view, it is not a packraft designed for regular use in white water stage 2. However, we would now also like to look at the equipment for whitewater suitability. Because here some weak points of the packrafts show up.

On the one hand, the seat cushion does not sit as firmly in the interior as expected. Due to the low water temperature of whitewater rivers compared to the air temperature of the environment, the pressure of the air tube and seat cushion decreases, so that both become softer. This is completely normal for inflatable boats. In this case, you have to re-pump after a short time or you put the boat to the water before the tour, let it “cool down” there and then re-pump.

itiwit packraft seat modification
The minimum length of the strap is still too long, so that the seat can slip back and forth

If the air tube and the seat cushion have too little air pressure, the seat cushion will slide forward about 10 cm the next time you hit the ground with the packraft (even though we have tightened the fastening strap of the seat cushion on the floor of the packraft to the maximum). The cushion is then too far forward and leaning against the tube is no longer possible. You slide with the bottom partly in the gap that has arisen. Paddling is then no longer fun. So, you need then to stop, pump up some air and position the seat correctly.

There would be a way to fix the seat more firmly to the floor with the strap (was mentioned as an idea in the reviews on decathlon.fr). This involves maximizing the length of the strap and inserting the seat cushion upside down (top of the seat cushion on the inside floor of the packraft) so that the strap is on the seat surface. Then the seat cushion sits much tighter, even though the air tube and seat cushion are softer. However, we do not see this alternative as a solution. The strap is very short for this and builds up too much tension at the fastening loops (where the strap is hooked to the floor).

From our point of view, the rear fastening loop for the seat cushion should be positioned further back on the inner floor and, above all, the distance between the two fastening loops should be short enough to prevent the seat cushion from sliding forward.

Another point of criticism are the non-locking carabiners of the thigh straps. With this type, the carabiner can be opened at any time by pressure intended but also unintentionally. There is no danger of a thigh belt coming loose as a result. This is because the carabiner has a kind of nose for this purpose, and it is not possible for thigh straps under pressure to slip out of the attachment loop. The real danger is that you get could get caught unintentionally (for example, with the life jacket or a piece of clothing in a capsize).

itiwit packraft 500 river
Most weaknesses came up on the whitewater usage

If you still want to use the Itiwit packraft occasionally in whitewater, you should replace the carabiners with lockable carabiners or do without the thigh straps and use a dry bag as a footrest instead. In our opinion, the luggage net with its long cord under the front deck is another danger if the cord stopper is not tightened (then there is a large loop in the footwell, which is another source of danger for getting caught in a capsize).

From the driving characteristics, you can definitely use the packraft for whitewater stage 2. It offers a sufficiently high air buoyancy, is very stable in the water, is nicely maneuverable to paddle into the eddies and the thigh straps (with the right carabiners) are a useful equipment to have enough support in the boat.

Repair of the Itiwit packraft

On a tour in Sweden, we unfortunately got a small crack in the floor of the packraft. The shores of the lakes we paddled were covered with sharp rocks. This was unfortunately bad luck and can happen with inflatable boats and that’s why you should always have a patch kit with you.

For small holes and cracks, the packraft already comes with three small and three large round patches that are suitable for quick and long-term repairs. The self-adhesive patches have a 3M 300LSE adhesive, which promises a high initial adhesion and a durable adhesive strength. The material of the patch is sufficiently thick so that the patched area should withstand stresses (e.g. grounding).

Patching the small crack worked very well for us right away, and the packraft is fully usable again with a small cosmetic blemish. However, the bottom did get more deep scratches, which we will observe over time.

Whole in the floor of the packraft
Choosing the right patch
Repaired packraft

Dismantling the packraft

The dismantling of the Itiwit packraft is as usual with Packrafts simple and fast. You open the valve of the packraft and release the air. If you have luggage in the air tube, you can now open the TIZIP.

On the seat you open the valve as well. There is a push button that you have to push in order to be able to push the air out. Theoretically, you can leave the thigh straps and the seat in the boat and fold the packraft like this. We take both out and put them separately in the transport bag.

First fold the packraft lengthwise. Make sure that it is not wider than the transport bag. Then you can roll up the packraft from the front to the rear. This has two advantages. Firstly, the remaining air can flow out of the valve unhindered. Secondly, the TIZIP is rolled up at the end and is not bent. The TIZIP should be closed so that no dirt gets into it when rolling it up, packing it or storing it. Now you can compress the packraft a bit with the included compression strap. The main purpose of the strap is to prevent the packraft from unrolling on its own.

itiwit packraft bag
Storing the packraft in the transport bag

When the packraft is folded narrowly, it fits wonderfully in the bag with accessories and can be compressed to the original pack size. To do this, pull the compression straps together. The packraft is compactly packed and compressed as soon as the side click closures on the bag can be closed.

Sometimes you just want to transport the packraft to the car and dry and fold it at home. Since the transport bag is generously sized and can be varied in size thanks to its roll closure, it is no problem to pack the packraft in a less well compressed state. The transport bag can be closed like a conventional dry bag with roll closure at the top and can be used as a handle for transport, unless you use the outer compression straps.

Strengths and weaknesses of the Itiwit packraft

The great strength of the Itiwit packraft is the very good price-performance ratio. It brings many features that are available from other manufacturers only in the higher price segment ( for example, TIZIP luggage compartment). Another strength is the very simple and convenient assembly. The inflation bag, which serves as a transport bag and dry bag, is brilliant.

The biggest weakness from our point of view reveals itself in the Itiwit packraft in white water. Here we lack the necessary robustness, a more effective splash water protection or a drain option and a better attachment of the seat. In addition, the non-lockable carabiners are a potential source of danger for getting caught in a capsize.

packrafting itiwit
The biggest strength of the Itiwit packraft is the price-performance ratio

Advantages

good workmanship + very good price-performance ratio + large and high-quality equipment in the price range (TIZIP, thigh straps, … ) + very easy and fast assembly through the pump bag + pump bag can be used as a transport and dry bag + sufficient carrying and safety handles available + simple but comfortable thigh straps (good padding and adjustable) + very well suited for bikerafting and multi-day river tours + numerous options to attach and stow luggage + good seating comfort + safe handling in calm waters (high tilt stability, high seat cushion, thigh straps, good maneuverability) + self-adhesive repair patches included

Disadvantages

– lower side of the side tube is hardly protected against high stresses – above-average heavy equipment for a packraft (seat cushion, thigh straps and inflation bag) – low splash water protection – only conditionally suitable for whitewater (insufficient seat attachment, non-lockable carabiners for the thigh straps, too little protection of the side tube, no sufficient splash protection or drain possibility) – according to the valve of the packraft 1.5 PSI should go up (unclear when these are reached, no hints in the description)

Conclusion on the Itiwit packraft

Itiwit has managed to bring a well-made packraft to the market at an entry-level price, which in many aspects goes far beyond an entry-level packraft. It is a packraft with a high level of equipment and a good range of applications and its price is a segment where the basic models of other manufacturers only start.

The Itiwit packraft Adventure 500 does not try to be one of the lightest or most robust packrafts for the most demanding packrafting. Instead, emphasis was placed on high-quality and high equipment (e.g. carrying handles instead of holding loops, thigh straps with carabiners, TIZIP, …).

packrafts decathlon
The Itiwit packraft is overall a good packraft

If you want to get into packrafting, you can’t go wrong with the Itiwit packraft in our opinion. It is a good all-rounder for large tours in flowing water and small tours on lakes. In addition, we consider the Itiwit packraft to be really well suited for bikerafting and multi-day river tours with noticeable current due to its luggage compartment and bows.

If, on the other hand, you are looking for a packraft mainly for whitewater use, we recommend another packraft (e.g. from Alpacka or MRS like the Alpacka Expedition or MRS Alligator 2S). The same applies if you want to go packrafting with a very high hiking part. Also in this area there are packrafts (e.g. from Anfibio like the Anfibio Delta MX) that weigh only half as much (so-called ultra-light packrafts) and offer similar driving characteristics, a comparable robustness, a good amount of space and sufficient comfort.

If you travel with your packraft in the off-season, you should also ask yourself when buying whether you need a closed deck to protect you from the cold, rain and spray. The small front deck of the Itiwit packraft does not offer this protection.

Alpacka Expedition Packraft Review

Alpacka Packrafts are very popular and have a high reputation in the packraft scene, especially among packrafters who do a lot of whitewater. In addition, Alpacka Raft promises to produce one of the best packrafts. In this review, we would like to take a closer look at the Alpacka Expedition and summarize our experiences with the packraft on the water. In particular, we have reviewed the Alpacka Expedition in size Large and with a removable whitewater deck.

alpacka expedition packraft

Technical Specs

Max. paddlers:
Length:
Width:
Capacity:
Packed size:
Material:

1
246 cm | 8’1”
91 cm | 3′
159 kg | 351 lbs
43 x 20 cm | 1’4” x 7”
210d high count nylon (hull)
840d ballistics nylon (floor)

Weight:
Produced in:

3.8 kg | 8.4 lbs
USA

Which model has been reviewed?

Alpacka Expedition with removable whitewater deck from 2020

How did we organize the review?

The Alpacka Expedition was provided to us on a rental basis by Packraft Europe. Packraft Europe is the Alpacka Raft dealer for the EU and delivers Alpacka Packrafts and packrafting equipment to any country within the European Union. Our review is independent of the manufacturer or store and reflects our own opinion of the boat.

How intensively has the product been tested?

low

high 1 bar = 1-3 km paddled (first impressions)
2 bars = min. 1 day/ 2 half-day tours
3 bars = min. 4 tours
4 bars = min. 8 tours
5 bars = min. 12 tours (very intense)

Where have we tested the product?

Whitewater

Calm rivers

Lakes

Table of Contents

Assembly and first impressions

The Alpacka Expedition is available in several color combinations (or custom color scheme for an additional charge), three sizes, and with a fixed or removable whitewater deck. You choose the size based on your required seat length. Depending on the size, the Alpacka Raft has an outer length of 231 to 246 cm. The width is identical for all three sizes.

Of the two deck options, the fixed whitewater deck provides the most effective splash protection and is ideal for paddlers who do a lot of challenging whitewater. For an additional cost, the Alpacka Expedition comes with a removable whitewater deck, giving you the ability to customize the packraft to suit your needs. We’re curious to see how well the removable deck keeps out the water on our model.

Alpacka completely eliminates the need for a plastic bag as packaging and packs the packraft and accessories in a lightweight thin fabric bag that you can use elsewhere. We think the idea of avoiding plastic is really great. A more robust bag for permanent use would have been even better, because the size of the bag is optimally adapted to the packraft and its accessories.

alpacka expedition bag
The packraft comes in a thin bag
alpacka expedition scope of celivery
Scope of delivery of the Alpacka Expedition
alpacka expedition large deflated
The unfolded packraft

The Expedition series is standard equipped with a Cargo Fly (luggage compartment accessible via a T-Zip zipper in the rear). A T-Zip is a waterproof and airtight zipper, which allows you to store your luggage inside the hull dry and safe. You must place the luggage in the inner tube before inflating the packrafts.

alpacka carry handle cargo fly
T-Zip of the Cargo Fly (inner luggage compartment)
alpacka dry bags
Dry bag (left) inside the hull

The packraft can be inflated with the supplied inflation bag.The dark green inflation bag is lightweight and makes a robust impression. Make sure that the T-Zip is completely closed before inflating.

The valve of the boat makes a very high-quality impression. The screw thread is very easy to handle. The valve can be opened and closed via the blue thread. To inflate with the inflation bag, you have to turn the blue thread slightly counterclockwise and screw on the thread of the inflation bag. Here we are missing the obvious marking that shows whether the valve is open or closed. With the inflation bag you get the packraft filled to about 80% with air. Then you turn the airbag off and create the final air pressure with your mouth. Here you should blow as hard as possible to get a good stiffness. Inflating the packraft with your mouth also works very well. No separate mouthpiece is required.

packraft setup
The inflation bag is used to inflate the packraft
alpacka packraft valve
The inflation bag is screwed on the valve
alpacka expedition inflation
You create the final pressure with your mouth

Then inflate the seat cushion via its air hose. It is best not to inflate it completely so that it is easier to place in the interior. The seat cushion is attached to the floor so that it cannot slip during the paddling tour. Then you inflate the seat according to your desired thickness. This is very easy, because the air hose of the seat is long enough.

The backrest (or back strap) is attached via four attachment points. You can adjust the backrest forward and backward via the two front straps, so you can adjust the packraft to fit your height and clothing (neoprene socks vs. hiking boots). Thanks to the generous dimensions of the seat cushion, there is still enough seating space when you put the backrest all the way forward.

alpacka expedition seat backrest
Alpacka Expedition seat cushion and back rest
alpacka expedition removable cockpit whitewater
Packraft without deck
alpacka packraft deck whitewater
Packraft with deck

The deck is attached via four zippers and two Velcro fasteners. The attachment and removal of the deck is very simple and works easiest when the packraft is not yet inflated or only slightly inflated.

The mounting of the coaming is simple and cleverly solved. The coaming is stiffened with an plastic ring. On the coaming there are two large insertion openings, each of which can be opened via a zipper. Here you can insert the ring, which is a robust plastic tube. The two openings make handling very easy. The second opening helps you to “push” the tube around better. When the plastic tube is back in the first opening, you can connect the two ends of the tube and close the zippers. This will give you a stiff coaming. The plastic tube stays in place and cannot come loose. This concept is very well thought out.

alpacka expedition coaming
Plastic tube for stiffening the coaming

When using the deck, you don’t have the full length of the interior available. The back rest can be set very far back, but then the deck is in the way, so you would be leaning against the coaming. For tall people, it would have been handy if the seat hatch started a little further back.

alpacka expedition packraft backrest
When the deck is used, the entire seat area cannot be used

Alpacka offers 4-point thigh straps and a foot brace as accessories for maximum performance in white water. The thigh straps can be adjusted very well. The footrest can be adjusted individually via the air pressure, so that it fills more or less space from the bow.

alpacka thigh straps
Optional thigh straps
alpacka packraft foot brace
Optional foot brace

The floor is made of 840D ballistic nylon coated on both sides, which is a high value for a packraft and makes an extremely robust impression. Ballistic nylon is one of the most durable weave patterns, which gives the material a very high tightness and tear resistance.

The hull is made of a 210D nylon, which is coated on one side (i.e. only from the outside). The one-sided coating saves weight on the one hand and on the other hand it increases the tear resistance of the material in contrast to a material coated on both sides (the fabric is not too embedded in the coatings and can react more flexibly when stressed. Thus, it does not tear until later). The only disadvantage of a one-sided coating is that it can leak more quickly in case of damage.

To prevent this, Alpacka has placed the floor very generously on the hull, so that it is additionally protected. This makes perfect sense, as the highest stresses occur on the bottom of the packraft.

The hull material is sewn together, taped and double welded. The bottom is both glued and welded to the hull.

alpacka packraft workmanship material
The workmansip is very good
packraft material
440D nylon (top) vs. 840D ballistic nylon (below)
alpacka expedition floor
The bottom is generously placed on the hull.

Dry bags are included in US and available as option in Europe. They can be attached inside the boat tube with a clip. They are used for safe and watertight stowage of luggage in the air tube. In addition, they additionally serve as separate air chambers in the packraft and thus increase the safety of the packraft.

alpacka packraft space
Dry bags for the Alpacka Expedition

you buy the dry bags separately they are a pretty expensive. We could not identify any special features of the dry bags compared to conventional dry bags. We recommend that you do not buy the dry bags if they are not included for the moment and buy them later if necessary. We had stowed luggage in the tube without the dry bags on several tours, which worked without problems. On a multi-day tour with sleeping bag and sleeping pad the dry bags were a useful addition, so that the camping equipment would stay dry in case of a tear in the boat skin. However, inexpensive dry bags are also sufficient here.However, these can then not be fixed inside the boat.

Very practical are also the attached red carrying loops at the bow and stern. Thus, the packraft can be carried comfortably to the water even in fully loaded condition by two persons.

Review of the Alpacka Expedition on the water

We have done very different tours with the packraft (from a small afternoon trip on a lake or river to whitewater tours between WW1-2+ and a multi-day tour with camping and hiking part). Depending on weather and use, we used the packraft as an open or closed packraft.

packraft bow bag
Alpacka Expedition with the optional Alpacka Bow Bag (24 liters)

If you don’t got whitewater paddling and good weather is announced, you can leave the deck at home. Without the deck you not only save weight (about 300g) and space in the hiking backpack, but also have more space in the Alpacka Expedition as a tall person.

We carried the bow bag (optional accessory) with us on every tour, as it proved to be very practical. It holds 24 liters, is easily accessible on the water and is securely attached to the bow via four carabiners. The bag opens via a waterproof zipper. It is ideal for storing camera, drinks and break snacks that you want to have at hand during the tour.

open packraft alpacka expedition
Without deck and with bow bag
alpacka expedition deck
With deck and bow bag
packrafting outdoor
With deck and hiking boots, the interior space is narrow even in size L

The opening of the deck is very large, so that getting in and out is possible without any big problems. With the deck up, we (189 cm / 6’2”) find the footwell a bit small, or just enough. After a while, we mostly paddled with our legs bent so that our knees stuck out. Without the deck, the space is much better for taller people.

packrafting river tour
Despite the slim back rest, the voluminous rear offers the possibility to lean comfortably.


We initially had to get used to the backrest because it sits very low. For comfortable paddling tours, we would have liked a higher backrest, because we are probably just used to it from other inflatable kayaks. Nevertheless, it is very easy to relax or paddle relaxed in the Expedition, because you can loosen the backrest on the water and thus lean on the tube.

In calm waters, the straight-line characteristic and speed is that of a 1-person packraft usual and does not differ from other packrafts without fins (e.g. nortik TrekRaft Expedition).  Packrafts with fins (e.g. Anfibio or MRS) have better straight-line characteristic in calm water. 

The packraft offers a lot of space without deck

We had tested the Alpacka Expedition on different whitewater rivers. In this water we liked the paddling performance best. The handling in white water is very good. It reacts more precisely and you can use more technique than, for example, on a nortik TrekRaft Expedition or Kokopelli Rogue. First, you sit higher due to the high seat cushion. Second, the Alpacka is minimally more tippy, but it’s easier to edge as a result.

The precisely adjustable backrest allowed us to adjust the packraft exactly to our height and needs. The thigh straps give even more control from whitewater 2 and 3. In whitewater, we found the interior space to be optimal in combination with the deck. It is a bit narrow, but offers such a good hold.

whitewater packrafting
The Alpacka packraft performs really well on whitewater

Attaching the spray skirt is really easy. It is extremely light and yet it made a robust and high-quality impression. The splash skirt has not slipped off us even once in the white water, even if you push against it with your knees. Nevertheless, it can be pulled down very quickly and easily with the help of the front loop, if it should be necessary.

The protection against splashing water by the removable whitewater deck in combination with the splash skirt is very effective. We had slight concerns at first that some water would get into the boat over time, especially in whitewater due to the water-permeable zippers. In whitewater level 2, we could not perceive any disadvantage to a solid whitewater deck. Although the zippers are not waterproof, the front and rear Velcro covers protect it from water. There is also an additional cover under each zipper so that the water is blocked from entering and is drained away again.

Dismantling the Alpacka Expedition

The seat cushion and the backrest can be removed from the boat very easily. For the seat cushion, you open the air hose and press out the air. You can leave the deck on the boat. Only the hose of the coaming should be pulled out before rolling up the packraft.

Now open the valve of the boat and push the air out of the packraft while folding it. The Packraft can then be rolled up again very easily into its original packing size, so that it fits into the supplied bag again without any problems. However, make sure that the T-Zip is closed and does not bend when rolling up.

alpacka expedition folded
The packraft rolls up very well into its original pack size.

Strengths and weaknesses of the packraft

The packraft’s greatest strength is its high quality, which is reflected in the material, workmanship, design and equipment. You can see that Alpacka has the ambition to build the best packrafts. If you look at the manufacturers or dealers website, you will quickly see that it is a boat made by packrafters for packrafters. We could not find any real weaknesses. At most points there are rather things that we liked less. But even that is complaining on a high level.

Advantages

+ very well thought out packraft + high configurability + very high quality workmanship + very robust bottom, which also sufficiently protects the side tubes from below + high quality valve + good seating comfort and fastening + high load capacity + very good performance in whitewater

Disadvantages

– high purchase price – valve position (whether open or closed) not immediately obvious – supplied bag in the long term not usable as a transport bag – complete interior with deck not completely usable and with hiking boots for tall people on long and relaxed paddling tours a bit narrow – holder for an optional fin would be useful

alpacka packraft review
A very well thought out and high quality packraft

Conclusion

The Alpacka Expedition is a very high priced and extremely high quality packraft. The material and workmanship indicate a long life. Alpacka rafts are among the most expensive packrafts on the market. Packrafts generally have a high price, at which outsiders can probably only shake their heads. The question arises whether the extra price is justified here. After testing and comparing it with other packrafts, we can say: Yes, the extra price is justified. You get an almost perfect packraft here, which is hardly anything to complain about. Nevertheless, you should consider whether you really need such a high-end packraft before buying it. It would be a shame if it is only used once or twice a season.

If you only want to paddle calm rivers or lakes, you can also choose a cheaper Alpacka Raft or packraft of another brand. However, for those who will use their packraft a lot and will put a lot of stress on it (e.g. whitewater), the Alpacka Expedition is a good choice. 

Packtraft – The Complete Buyer’s Guide

best packrafts

Packrafts have become increasingly popular in recent years. These small, practical inflatable boats are particularly popular with adventure travelers. But many people living in big cities are also slowly acquiring a taste for these practical boats. Packrafts require almost no storage space, can easily be carried in a normal hiking backpack and are ideal for transporting on public transport. They offer many people a way to paddle without a car and a lot of space at home and to escape the hustle and bustle of the big city.

What is a packraft?

A packraft is a very light, compact and stable inflatable boat, which can therefore also be carried along when hiking or biking. In fact, a packraft is a backpacking boat that can be used during a hiking or biking trip to cover parts of the trip with a small inflatable boat.

Thanks to the good maneuverability and tilt stability, they are often seen on white water and are also quite suitable for this use. Nevertheless, packrafts are mainly used to have a small boat with you on your expedition.

packrafting outdoor
Packrafts are light and compact inflatable boats

ITIWIT PACKRAFT 100

itiwit-packraft-100

Weight: 2 kg | 4.4 lbs

super light and compact

very affordable

ITIWIT PACKRAFT 500

itiwit-decathlon-packraft

Weight: 3.8 kg | 8.4 lbs

ideal for bikerafting

many features like T-Zip

ALPACKA EXPEDITION

alpacka expedition packraft

Weight: 3.8 kg | 8.4 lbs

high-quality packraft

Made in US

Is packrafting the right thing for me?

For a small inflatable boat, the purchase cost is very high. Well equipped packrafts with a robust boat skin can cost up to $1000 and more. But the possibilities you have with a packraft are enormous. Nevertheless, you should ask yourself in the beginning if you really use the possibilities of a packraft. From our point of view, a packraft is the right inflatable boat for you if the following aspects are important to you:

  1. If you want your inflatable boat to be as portable as possible. Packrafts have a very low weight as well as a small pack size and therefore offer the best portability among portable boats at all. There are even ultralite packrafts that are no bigger than a beverage bottle. You can plan your trips with a packraft much more spontaneously and also more flexible, because it is a real “always with you boat”. It can fit in any daypack, luggage, trunk or campervan. Decide on the spot or during the day if you really want to go paddling. After the paddle, you can dry the boat on the clothes rack at home. When dried, a packraft will fit in any closet. Thus, a packraft is perfect for adventurous spontaneous city dwellers and travel enthusiasts.
advantages packraft boats
Packrafts are extremely compact when rolled up and can be stowed in almost any backpack.
  1. If you are a nature sportsman or outdoor enthusiast and want to go on land-water tours. With a packraft in your backpack, you have the opportunity to discover nature from a new perspective. Because of the easy transportability of packrafts you can combine paddling with another outdoor activity and your tour planning is almost unlimited. You use your packraft where the trail ends and the shore begins. So you can paddle to an island, cross lakes or hike upstream and paddle back downstream with the packraft. Packrafts are not only very transportable, but you can carry a lot on the bow of a packraft itself (e.g. a bicycle). It’s not for nothing that the term bikerafting has become established.
hiking packrafting
Hiking first and then paddling downstream by boat? No problem with a packraft

If you want to paddle mainly flowing water or even whitewater. Packrafts have a high buoyancy due to their voluminous side tube and have a wide short hull. These characteristics make packrafts very stable and very maneuverable on the water. That is why packrafts are popular in white water as well as on small and swiftly flowing rivers. Here, the slowness of a packraft is hardly noticeable due to the current of the river and obstacles can be avoided very easily. Especially on whitewater rivers, a packraft opens up new possibilities because you can reach riverbanks that are only accessible on foot. In addition, the problem of having to catch up with the car after the tour is eliminated, since you can walk to the next stop at the end of the tour and take public transportation. If, on the other hand, you want to go on long tours on standing water, a packraft will not give you much pleasure in the long run. Most of the 1-person packrafts are too slow.

packraft whitewater
Packrafts enjoy a great popularity in whitewater

Whitewater packrafting

Even though packrafts are very beginner-friendly compared to traditional whitewater kayaks and therefore forgiving of many technique mistakes, the water still remains unchanged. Paddling on whitewater requires appropriate safety equipment (e.g. life jacket with sufficient buoyancy, helmet, throwbag, signal whistle, …), the correct assessment of the current water conditions when planning the trip (esp. water level and discharge), safe maneuvering of the packraft and early danger recognition on the river. These aspects and others should not be underestimated.

If at least two of the above points apply to you, you should definitely continue reading this article. Because there are numerous tips waiting for you, which we could collect in the last years with packrafts.

If only one or none of the points apply to you, but you still feel like paddling, you should consider the other types of inflatable boats (e.g. inflatable kayak or inflatable canoe). For example, a solid 2-person inflatable kayak costs between $500 and $900. This begs the question of why packrafts are more expensive.

Equipment that is very light yet sturdy is known to cost significantly more. The cost of materials is higher. In addition, most of it is made by hand and in small series compared to other types of boats. The margin on a packraft has to be higher so that suppliers can make a living from manufacturing and selling them. This is because packrafts are still a classic niche product today. For the price of a packraft you already get a solid inflatable kayak with good paddling characteristics, which you can paddle alone and with a friend.

The best packraft for your needs

As mentioned at the beginning, the possible uses of a packraft are almost unlimited. If hiking tours with packraft are in the foreground, a small pack size and weight are important. For bikerafting, you should make sure that the packraft has a sufficiently high load capacity, a large bow and sufficient attachment options.

In addition, you should consider which waters you will usually paddle. In principle, packrafts are much better suited for flowing waters than for large lakes and seas. If you only want to do small, leisurely tours on a lake, you will still be happy with a packraft. If you want to do tours of several hours on calm waters, you will paddle much better with a long 2-person packraft. Lakes can be paddled well with a long 2-person packraft. For whitewater you should pay attention to the right equipment, which we will discuss below.

packraft river
Some 2-person packrafts can be paddled solo as well and offer better paddling performance on calm water

1-person vs 2-person packraft

1-person packrafts: This size of packrafts is the most common. Here there is the largest selection of models. They are very compact as well as maneuverable and therefore very popular especially in white water. If you want to do packraft tours alone, this is the right packraft for you. But even if you are paddling with other packrafters, a 1-person packraft has its advantages: you determine your own paddling pace, develop your own paddling technique and can make one or the other detour independently of the others, for example to look at something close to the shore. 1-person packraft are available in numerous lengths, so that even for tall people there are sufficiently large 1-person packrafts.

Did you know …?

Manufacturers, such as Alpacka Raft, MRS and Mekong, offer their 1-person packrafts in different sizes. So you can choose the packraft according to your body size. Especially if you use the packraft in whitewater, the right size is important. If a packraft is too big, it offers too little support in white water. Alternatively, an inflatable footrest can help. If you like it cozier and more comfortable, you can also choose a slightly larger packraft for calm water and light whitewater.

1 person vs 2 persons packraft
Many manufacturers also have 2-person packrafts available

2-person packrafts: This size of packrafts could be interesting for you if you want to paddle often with someone else in the same boat and like to travel on calmer waters. On the one hand, the purchase costs and the weight per head are lower with a 2-person packraft. On the other hand, 2-person packrafts are longer, i.e. they have a noticeably better straight-line characteristic and are faster on the water. Plus, you can take turns paddling with your paddling partner. A majority can be paddled with a double paddle or with a single-bladed paddle as a canoe. Families with children also like to prefer 2-person packrafts over 1-person packrafts.

Packraft features

In this section, we will discuss the different features so that you can make a better decision about what you need and what you do not. The good thing is that most of the equipment can even be added later on. However, keep in mind that each additional feature will increase the weight of your packraft.

  • Bottom: Compared to inflatable kayaks, the majority of packrafts do not have an air chamber in the bottom. Instead, a robust “tarpaulin” is tightly attached to the underside of the tube. In whitewater, however, there are now some models with an integrated (e.g. Alpacka Forager) or insertable bottom chamber (e.g. Kokopelli Nirvana Self Bailer). Such an air chamber in the bottom offers some advantages especially in whitewater: It provides additional buoyancy and cushions groundings better. Some open packrafts even have a bottom with a self-bailer, so that any water that enters can drain away on its own.
  • Seat: An inflatable seat gives you an elevated seating position, making it easier to stick the paddle in the water. In addition, a seat isolates well from cold water. If you’re going on long trips and value comfort, you should also look for an inflatable seat with a backrest. For white water paddlers, packrafts with a variably adjustable backrest (in the form of a back belt/strap) are recommended. This design can be found on many Alpacka and Kokopelli packrafts. If you want to travel lighter, just leave the seat at home. The first packrafts with their minimal equipment did not have a seat. In fact, you can do without a seat because you can lean directly on the air tube and use a backpack or big dry bag as a seat. For a river crossing it is quite sufficient.
packraft seat net
Some packrafts come with a seat net
packraft backrest
Packrafts with adjustable backrest
nortik trekraft expedition seat
Inflatable seats are ideal for long river trips.
  • Interior luggage compartment: Due to their small size, Packrafts offer little space to store luggage inside. Luggage must usually be secured to the bow or stern with straps or cords. Especially the bow offers space for a large backpack (up to about 60L or more). This is quite enough for a day trip. If you’re on multi-day trips, additional storage space can be a big advantage. Additional storage space (depending on the model 100 – 140L) is provided by internal luggage compartments, where you can store your luggage safely and dryly in the air tube of the packraft. During the ride, however, you can not get to your luggage, unless you let the air out. There are different names for the internal luggage compartments depending on the manufacturer (e.g. Cargofly for Alpacka, TubeBags for Anfibio, ISS [Internal Storage System] for MRS, T-Zip for Kokopelli and Mekong). Where T-Zip refers to the waterproof and airtight zipper. Internal luggage compartments can also be another security feature. Manufacturers offer special dry bags for the luggage compartments, which can also be used as air bodies. Interior luggage compartments always come at an extra cost and increase the weight of the packraft. An interesting alternative would be a larger Packraft, so you can stow your luggage in the footwell. Because of the length, the packraft also runs better.
packraft luggage
Interior luggage compartments
alpacka packraft space
Luggage stowage with dry bags in the bow with T-Zip
  • Deck: If you’re paddling whitewater or in the colder months, a deck is almost essential (unless you’re paddling with a drysuit in a self-bailing packraft). A deck protects you from weather, splashing water and waves. Very common is the deck with a seat hatch and coaming, to which a splash skirt can be attached. This way the packraft is completely sealed like a whitewater kayak and keeps you very well dry from waves in whitewater. In calm waters, it can be paddled without a splash skirt, and still keeps the interior dry from splashing water. In addition to the deck with seat hatch, there are also decks with an integrated spray skirt. For entry and exit, these have a zipper and Velcro closure, so they don’t seal completely. They still protect you well from cold, splash water and dirt. The zip and Velcro fasteners allow the deck to be rolled up. So you have an open packraft in no time. If you want to go paddling regularly in white water, we recommend a deck with a seat hatch. There are now also variants that can be reconfigured as an open and closed packraft with a zipper.
packraft test
Deck with seat hatch and sealed with a splash skirt
anfibio packraft spray skirt
Deck with an integrated splash skirt
alpacka packraft cockpit
There are decks with seat hatch that can be removed via zippers

Fin: Still little established but very practical is an attachable fin. Some models from Anfibio (e.g. Anfibio Delta MX or Rebel 2K) and MRS have a fin holder included to attach a directional fin. A skeg noticeably improves the directional stability of the packraft and thus increases paddling efficiency. The packraft is less likely to turn, so it is ideal on rivers with sufficient water depth and lakes. Regardless of the model, you can also install a fin yourself. Taking pictures in a packraft with a fin is much more comfortable. The boat drifts slower when you stop paddling. Fins are not suitable for whitewater use, as they reduce maneuverability. Also, depending on the water level, you would unnecessarily touch down with a fin.

packraft skeg
Depending on the water level you can use a fin.
ultralight packraft anfibio
Typically, the fin in is mounted on the tail.

Materials and workmanship

At first glance, you might think that the boat material of a packraft can’t be very durable, as it feels relatively thin. However, the material of a packraft has nothing to do with the cheap PVC inflatable boats you can buy in supermarkets. Packrafts can be used in white water, and for that reason alone must be able to resist high stresses.

In principle, there are two main elements: a bottom hull and an outer tube. The outer tube goes all the way around the boat and is inflated with the help of an inflation bag and by mouth. The floor, on the other hand, is not inflated, but is simply a strong tarpaulin.

  • Materials used: For the boat skin of packrafts, usually a coated fabric material (polyester or nylon) is used. Rarely, packrafts are made of PVC film, which is much heavier and less tear-resistant.
  • Material thicknesses: The strength from the fabric material is expressed in denier (abbreviated as D). The higher the denier number, the thicker the fiber and the more durable the fabric. For example, a 420D nylon is more abrasion resistant and sturdy than a 210D material, but the 210D packraft is lighter. The bottom has the highest stress, so this is usually made of a stronger material than the side tube. Nevertheless, the robustness can be derived not only from the material thickness, but from other factors (eg coating, processing, construction, …).
packraft material
440D nylon (top) vs. 840D Ballistic nylon (bottom)
packrafting repairing
420D nylon (top) vs. 210D nylon (bottom)

Coatings: Urethane, polyurethane (PU) or thermoplastic polyurethane (TPU) are usually used as coatings. The thickness of the coating is specified in g/m². The floor is coated from both sides, as it is subjected to stress from both outside and inside the footwell. For the tube, it differs depending on the manufacturer. Some manufacturers coat the tube on both sides so that if the outer coating is damaged, the material will still hold tight thanks to the inner coating. Other manufacturers, on the other hand, coat the tube on one side because this allows the fabric material to yield better and distribute the “tearing stress” over several fibers when stressed. As a result, the fabric material remains more tear-resistant.

Packraft manufacturers

There are now many manufacturers in the niche market of packrafts. To make your research easier, we would like to introduce some of the most important manufacturers here.

best packrafts
There are many different packrafts brands on the market
  • Alpacka Raft is the first manufacturer of today’s modern packraft and an established brand among die-hard packrafters, especially in whitewater. Alpacka Raft offers packrafts with a very high quality of workmanship and robust boat skin, designed and manufactured in the USA. Alpacka offers from ultra-light packrafts with minimalist features to whitewater packrafts with the highest possible performance. In Europe, they are distributed through Packraft Europe and Canoe School Versam. We have already paddled a Alpacka packraft and loved it. Read our review about the Alpacka Expedition.
  • Anfibio is the private label for ultralight packrafts of the German online retailer Packrafting-Store. The packrafts are not manufactured by the company itself, but in cooperation with a manufacturer in China. Thereby, the retailer acts strongly in the conception and accompanies the development up to the production. Due to their low entry price (compared to other Packrafts), very low weight and very compact pack size, the packrafts are aimed primarily at beginners, occasional paddlers and outdoor enthusiasts who want to combine their activities with paddling.
  • Itiwit is the brand for watersports from Decathlon. They are known for their affordable entry-level produtcs with a solid quality.They offer inflatable kayak for a pretty long time and extended the product range to packrafts recently as well. Their first packraft was the Itiwit Packraft Adventure 500, which we have already reviewed. Regarding price it’s the perfect packraft for beginners but in terms of workmanship, material and features it also attracts more advanced packrafters who love bikerafting.
  • Kokopelli is an American packraft brand. The boats are designed in the U.S. but manufactured in China, resulting in the lower price for the Packrafts compared to Alpacka’s Packrafts. Within a short period of time, Kokopelli was able to gain a high level of recognition in the outdoor industry. Kokopelli’s range covers all areas of use from white water to sea paddling. The manufacturer continuously improves its packrafts and constantly expands its product range.
  • Mekong is one of the youngest and few manufacturers of packrafts that develops and produces in Europe. Currently, there are still few experience and models of the French manufacturer Mekong. However, the available models are configurable and seem to have a good price-performance ratio.
  • MRS stands for Micro Rafting System and also offers a variety of interesting packrafts. The manufacturer produces in small series in China, also in cooperation with the Packrafting-Store. Although the Packrafts are developed and produced in China, due to the high price of over 1000€ and exclusively positive reports on the Internet, it can be assumed that the Packrafts are of high quality. For example, MRS is the only brand to offer a 2-person packraft with a deck as well as the longest 1-person packraft currently available with a hull length of 295 cm.
  • nortik is a brand for “backpack boats” of all kinds from the company Out-Trade. Among paddlers the brand nortik has made a name for itself and stands for high quality portable boats. Ideas as well as developments are generated and implemented in Germany. A large part of the nortik brand is produced in St. Petersburg, Russia at the long-standing Out-Trade partner Triton. In 2014, the first nortik Packraft named “TrekRaft” was launched. Packrafts from nortik are aimed in particular at price-conscious prospective customers who are looking for a functional and robust packraft.
  • Other suppliers: In addition, there are other manufacturers or suppliers of Packrafts and are mentioned here for completeness: AIRE, Aqua-Xtreme, Biluta, Frontier, Kodiak, NRS Packraft, Pinpack, Redriver, Sputnikraft, Verano.

ITIWIT PACKRAFT 100

itiwit-packraft-100

Weight: 2 kg | 4.4 lbs

super light and compact

very affordable

ITIWIT PACKRAFT 500

itiwit-decathlon-packraft

Weight: 3.8 kg | 8.4 lbs

ideal for bikerafting

many features like T-Zip

ALPACKA EXPEDITION

alpacka expedition packraft

Weight: 3.8 kg | 8.4 lbs

high-quality packraft

Made in US

Do It Yourself (DIY) Packrafts

The biggest cost factor for packrafts does not come from the materials used, but in the manufacturing process itself. Packrafts are handmade, and that makes a big part of the costs. DIY packraft sets offer you the possibility to build your own packraft at low cost. The kits contain the pre-cut materials that need to be ironed together to make a packraft. Prior experience is not required for the DIY Packraft. Depending on experience and kit, it can take over 40 hours to build. Compared to the packrafts from big-name manufacturers, the DIY do not sew the tubes and bottom together.

DIY Packraft

DIY Packraft is not a manufacturer of packrafts, but makes you the manufacturer of your own packraft. Only the materials, such as valve and boat skin, must be purchased. Thereby the components of the boat skin are already pre-cut. The main tool is a special welding machine, with which you close the seams. Step by step videos then explain how you can then make your own packraft. And when you look at the results, you have to say that the boats look like they were bought from the store. This does not only fills you with a lot of pride at the end, but also saves you quite a bit of money. The material for the cheapest model currently costs about 180€. They ship worldwide and takes between 15 and 25 hours to build the packraft, according to the site.

Long-term experiences can be found on the English-language blog michaeldeckebach.com. After numerous uses of the self-built Packrafts, the blogger is convinced of the construction and the material of the boat. At the same time, however, he points out that the seams are the packraft’s weakest point and that the boat therefore needs to be repaired at regular intervals. For a professional sealing of the seams you would need, according to the opinion of the blogger, a high-performance iron, which packraft manufacturers use but for the construction of one or two boats that would be too expensive.

Iron Raft

The British supplier Iron Raft also offers a kit to build a packraft yourself. The kit is available in three different sizes, depending on the size of the paddler. To assemble the packraft, the company recommends an iron that can apply a constant heat of at least 220°C.

Strengths and weaknesses of packrafts

The great strength of packrafts is undoubtedly the extraordinary flexibility thanks to the small packing dimensions and low weight. However, since most packrafts are quite wide and short, they don’t have the best straight-line characteristic and don’t reach the speeds as conventional kayaks.

packraft size
A packraft is very compact and light to transport

Advantages

+ ideal for long tours thanks to high payload + extremely light and compact + very easy as well as quick assembly and disassembly + very robust boat skin

Disadvantages

– high purchase price – vulnerable to wind – most models are rather slow and do not have the best directional stability

Inflatable and folding kayaks as alternatives

Have you always wanted to buy a kayak or canoe, but you just don’t have the space to store it or the car to transport it? A packraft would eliminate all of that and allow you to enjoy your paddling hobby. But not only packrafts offer you this possibility. If you want to use your boat exclusively for touring on lakes and rivers, without combining it with hiking or biking, then conventional inflatable kayaks or folding kayaks may be a better choice.

advanced elements solo inflatable kayak
Inflatable kayaks have a better performance on the water than packrafts.

Inflatable kayaks or inflatable canoes are the same in shape as the rigid-hull variants. They are definitely heavier than packrafts, but can still be transported on buses or trains with a backpack. They have the better running characteristics and more comfort, especially on lakes. In addition, there are high-quality models that are far cheaper than packrafts and are therefore more affordable for most beginners.

Those who attach great importance to the fact that the handling of their boat is close to that of a solid kayak should go for a folding kayak or folding canoe. Such boats have a very good stiffness and really good paddling characteristics. In terms of price, most folding boats are more expensive than inflatable boats.