The Solar is a real classic among the inflatable kayaks from the manufacturer Gumotex. It is an open inflatable kayak that can be paddled alone or as two person kayak. A third seat can even be added as an option so that a child can also come along. We have already paddled the Solar on several tours and would like to share our impressions with you here and draw comparisons with other Gumotex inflatable kayaks. In our test, we will look at how the Gumotex can be paddled alone and with two people.
Advantages and Disadvantages of the Gumotex Solar
The greatest strength of the Gumotex Solar is that it can be paddled very well by two people as well as alone. In both configurations, there are no compromises in terms of handling characteristics or space for the paddlers. Although it is a 2-person kayak, we would also recommend the Solar to those looking for a 1-person kayak only.
This also works with the Gumotex Thaya (up to 2+1 people), Rush 2 (up to 2 people) or Seawave (up to 2+1 people), but these also cost a few hundred euros more. If you can do without an optional spraydeck, a steering system or a drop-stitch floor, the Gumotex Solar will save you a lot of money.
On river tours you will get some water into the kayak due to a missing spray deck
Due to the lack of splash protection, the Solar is more suitable for paddling in warmer temperatures, unless you use suitable paddling clothing. Although the Solar has a high load capacity, the interior can be too cramped for heavy people.
Advantages
+ good rigidity + very solid workmanship + simple and durable construction without a lot of frills + stable on the water + good directional stability + can also be paddled very well alone + quick assembly and disassembly + plenty of legroom + very comfortable seating (high backrest, seat cushion and backrest can be inflated separately) + can be used as a single, double or triple kayak + Solar 019 has become lighter + high weight load capacity of 270 kg + 2-year guarantee + spare parts can be reordered + produced in Europe
Disadvantages
– somewhat cramped interior – reduced spray protection on the bow from Solar 019 (the person in front can quickly get wet in small waves) – no option to retrofit a spraydeck (but with a small splash guard for the front which is overpriced) – as a 2-person kayak only suitable for multi-day trips to a limited extent (little space and fastening options for luggage. A kayak with a spraydeck offers more options here) – Overpriced splash guard for the bow
Conclusion to the Gumotex Solar
We really liked the Gumotex Solar. It is a high-quality and simple kayak. The robust material, the solid workmanship and the simple, no-frills design ensure that you can enjoy the boat for a long time, even with intensive use. The boat’s length and skeg give it good directional stability.
The Gumotex Solar is also a great 1-person kayak
The increased operating pressure of 0.2 bar (cheap inflatable boats have only half or even a third of the air pressure) gives the boat good rigidity. The air chambers (especially the side chambers) feel nice and firm and stable as a result. At first glance, the air kayak seems expensive, but you get a lot for your money. It can be used as a single, double and triple kayak. It comes with an 80L waterproof transport backpack, which you can use to store the boat and transport it conveniently by public transport or by car in the trunk. The quick assembly and disassembly also make the Gumotex Solar a spontaneous companion and a kayak for after-work trips on the water.
It is by no means a boat exclusively for the lake, but a fully-fledged kayak with which you can go on long tours on nice days. The Gumotex Solar really comes into its own on lakes and calm rivers. The kayak is mainly intended for paddling in warm temperatures, as it has no splash guard and can therefore get a lot of water in the boat.
The Gumotex Solar offers enough space for two tall paddlers.
Although the price of the Solar has risen in recent years, as with other inflatable kayaks, we believe that the Solar still offers very good value for money.
MRS stands for Micro Rafting System and also offers a variety of interesting packrafts. The manufacturer produces in small series in China, also in cooperation with the Packrafting-Store. Although the Packrafts are developed and produced in China, due to the high price of over 1000€ and exclusively positive reports on the Internet, it can be assumed that the Packrafts are of high quality. We had the chance to test two MRS packrafts on the water.
MRS Alligator 2S Review
The MRS Alligator 2S is a packraft which, according to Packrafting-Store, is designed for demanding packrafting. For us, demanding packrafting means that packrafters want to use their packraft intensively under demanding conditions (e.g. whitewater packrafting, large land-water tours, bikerafting, …) and expect a high level of sophisticated equipment.
The MRS Alligator 2S is a great white water packraft
Advantages
high-quality workmanship + robust boat skin + high-quality skeg fitting (with optional deep-water skeg noticeably better directional stability) + light and compact pack size from the perspective of the equipment and performance + comfortable seating position + easy re-entry from the water + very stable + forgives many mistakes in white water + very well braced coaming + tight and sporty fit (ideal for paddling in white water) + can be optionally equipped with a footrest + robust floor, which also adequately protects the air chamber from below + good thigh straps included + accessories and spare parts available + 3-year guarantee on materials and workmanship
Disadvantages
simple valve design for this price range (simple, functional and robust but valve opening for inflation bag has no recoil and upper valve piece can quickly get lost) – intact valve of the seat cushion on our model leads to air escaping from time to time – small people are dependent on the optional footrest – seat position can only be varied to a limited extent (optional footrest or supplied thigh straps may be necessary) – only repair material but no repair kit (i.e. material including glue) included in the scope of delivery
The MRS Alligator 2S is a very solid and sporty packraft with a wide range of uses. If you are looking for a compact packraft with a high level of stability and agility for paddling in rough water and white water, the Alligator 2S is a good choice.
On the one hand, it is still light and compact enough to take with you on multi-day packrafting or bikerafting tours. With the optional deep-water skeg and the pointed, elongated tail, calm rivers and lakes can be paddled more effectively than with other packrafts without a skeg. On the other hand, with its whitewater spraydeck, it offers optimum splash protection and, with the tight fit and the thigh straps supplied (with the optional footrest if required), a very good hold and plenty of control in whitewater.
Bikerafting with the MRS Alligator 2S
The price is high, but for a fully-fledged whitewater packraft it is in line with the market. If you do without the internal storage system, you can reduce the price even further and get a robust yet well-equipped packraft for white water. In our experience, a luggage compartment in the air chamber with an airtight and waterproof zipper is very practical, but only a must-have feature for multi-day tours. On day trips, you can manage very well without it.
MRS Nomad S1 Review
Packrafts are mainly short and maneuverable boats that are primarily used in white water and fast flowing water. With the Nomad S1, however, MRS offers a packraft which, thanks to its length, is also suitable for longer tours on lakes and calm rivers. It is advertised as having running characteristics that allow packrafters to keep up with conventional kayaks.
The MRS Nomad S1 is one of the longest 1-person packrafts on the market
Advantages
Running characteristics similar to an inflatable kayak + Speeds of up to 6 km/h are realistic + Can also be used for white water + Good workmanship and robust material + Air chamber is generously protected by the floor material + Spraydeck can be rolled up (can therefore be reconfigured into an open packraft) + Spray skirt and skeg already included in the scope of delivery
Disadvantages
high purchase price – simple valve design for this price range (simple, functional and robust but valve opening for inflation bag has no recoil and upper valve piece can quickly get lost) – seat position can only be varied to a limited extent – for tall paddlers possibly (depending on the tour, footwear and subjective feeling) little legroom – only repair material but no repair kit (i.e. material including glue) included in the scope of delivery – more difficult to paddle in white water than the Alligator 2S
The Nomad S1 is unrivaled in the packraft segment. If you really want to combine paddling with other outdoor activities (e.g. hiking, biking) or want to have the boat with you on every vacation without any problems, you should consider the Nomad S1 more closely. Although it has a hefty price tag, in this case the boat simply opens up possibilities that are not so easy to achieve with conventional inflatable kayaks.
The MRS Nomad S1 showed a good performance on lakes
However, if you are mainly looking for a compact 1-person boat that you can transport in a backpack, you should consider whether an inflatable kayak might be enough. Although these are a lot heavier and bulkier in terms of pack size, there are already cheaper models available and some come even closer to a conventional kayak due to their design. Many 1-person models can also be transported in a backpack, at least for short distances (around 30 minutes).
Moraine Lake, with its Ten Peaks mountains, is one of the most photographed landscapes in Canada. Although this mountain lake is not big at all, the color of the lake and the surrounding landscape is overwhelming. We were more in awe than paddling. The azure water, the picturesque mountains with their snow peaks, the lush green pine forests create a unique experience on the water. This canoeing and kayaking tour report is not only about the route on the lake, but above all about important tips that you should consider.
Key facts about the paddling tour
Duration
1 – 4 hours
Culture
–
Public transport
–
Traffic noise
no traffic noise
Landscape
azure water, stunning mountain scenery, surrounded by forests
Table of Contents
The best time for kayaking and canoeing on Moraine Lake
It’s normally possible to paddle on Moraine Lake from mid-June to mid-September . At that time the canoe rental is also open. Out of season, the lake may freeze over or the weather may be too inconsistent. We paddled the lake at the end of June and had perfect conditions. Especially between June and early July, the water is supposed to be particularly azure blue, as the meltwater is fresh from the mountains and still crystal clear.
The canoe rental shop is open from 8:30 AM to 6:30 PM. We recommend paddling early or late, as at other times of the day there are a lot of tourists. Even at 8:30 AM, if the weather forecast is good during the summer months, the lake will be very busy. The problem with Moraine Lake, first and foremost, is getting a parking spot. There are not many parking spaces and if it is completely overcrowded, the 12 km (7.5 miles) access road will be closed or the road will be completely jammed.
We recommend to paddle in the late afternoon, because then many tourists start their drive to the hotel. Also, the light conditions for photos are better in the late afternoon or evening than in the morning. The morning sun shines very strongly on the mountains and then makes them look a bit too bright. In the evening sun, the whole landscape looks beautifully warm-exposed.
Canoe rental at Moraine Lake and prices
Renting a canoe is very expensive, starting from $130.00 CAD plus tax per canoe for a one-hour rental. A canoe can take up to 2 to 3 people. Is this price worth it? In good weather, definitely. It is a unique way to experience the lake and get away from the crowds for a bit. Since the lake is not big, an hour is usually enough. However, we must confess that we spent several hours on the lake because the lake and the landscape fascinated us so much.
We were in the comfortable situation to explore the lake with our own inflatable kayak. So we were able to start our tour in the evening when there were only a few people out. We arrived at about 5:30 PM and after a little exploring on foot and setting up the boat, we were on the water from 6:30 PM to 9 PM. Apart from another inflatable canoe, we were the only boat on the water and could enjoy the silence as well as beauty of nature completely for ourselves. There are already inflatable kayaks for around $150 (e.g. Intex Explorer K2 or Challenger K2), which costs slightly more than the rent. You can stay longer on the water, start at a late hour and have the lake to yourself as well as use the boat afterwards for other tours. Also in our inflatable kayak or inflatable canoe guide you will learn more useful information if you want to buy your own boat.
The water of Moraine Lake was really clear and azure
Especially the evening sun shines a very nice warm light on the Ten Peaks
Our kayaking tour on Moraine Lake
Let’s get to our actual route on Moraine Lake. Since Moraine Lake is very small, it is not necessary to plan the route in advance. You can paddle as you like without missing anything. Nevertheless, we would like to present our route to you and mark some spots that we found particularly interesting.
If you go from the parking lot towards the lake and walk along the right side of the lake, after a few minutes you will see the canoe rental. There or just around the canoe rental there are good opportunities to assembly your own boat and get it in the water. In the middle of the lake you have the best view of the mountain panorama. Nevertheless, you should also paddle along near the shore, not only to get an impression of the lake and the massive mountains, but also to get a look at the beautiful shore.
At the end of the lake there is a landing place, which you would otherwise reach on foot as well
Back we went a bit faster before it gets dark. The sun is already behind the mountains
We recommend paddling along both the west and east shore sides for a bit. Moraine Lake then narrows at the end, from a distance it looks like a bend. But here it really ends unfortunately, the lake is blocked and it is a shallow tributary that you cannot paddle. At the western end of the lake there is still the possibility to dock with the boat to be able to look at the lake and its tributary from the land.
A tributary at the end of the lake
Many wonder whether to rent a canoe for one or two hours. In general, one hour is enough to explore the lake for the most part. However, we think that you can and should enjoy it longer than one hour. With two hours you simply have more time and you can enjoy the really unique nature without time pressure. In the end, however, it is a matter of taste and a question of budget. Here it would be advantageous to take your own boat. We had met a couple from the U.S., which had taken among other things for this lake their inflatable kayak, because it came cheaper than to rent a canoe. We had done it that way too and compared to high rental costs it was definitely worth it. So you can paddle in the evening and you have the lake almost for yourself.
More information about the lake can be found on the page of Banff National Park.
After a short time the canoe station was in sight, where we had started our paddle tour
Other Activities in Banff
Banff National Park offers countless other opportunities for hiking and paddling enthusiasts. We would like to briefly introduce you to other activities we have done in the region.
Paddling Lake Louise
Only 20 km (12.5 miles) away is Lake Louise, probably the most famous lake in Canada. We paddled Lake Louise the next morning. Especially how the cloud cover opened up and the mountains came out was spectacular. In size, it is similar to Moraine Lake. Again, there are canoe rentals or you can paddle your own boat. Learn more about our paddling trip on Lake Louise in our article.
Icefield Parkway
A few miles north begins the Icefield Parkway, which connects the Banff and Jasper National Parks. The highway is considered one of the most beautiful roads in North America. We drove the Icefield Parkway in both directions and would not want to miss the experience. We were even lucky enough to see several black bears along the way.
Hiking the Sunshine Meadows Trail
The Sunshine Meadows Trail is said to be one of the most beautiful trails in Banff. Depending on the day, you can get to the trail either by gondola or by bus from Sunshine Village. On the website of Sunshine Meadows Banff you will find the exact departure information. At the top you will find small pretty lakes and well laid out hiking trails, which can be hiked in 3-4 hours. We can only recommend the hike, because it gives another insight into the mountains of Banff.
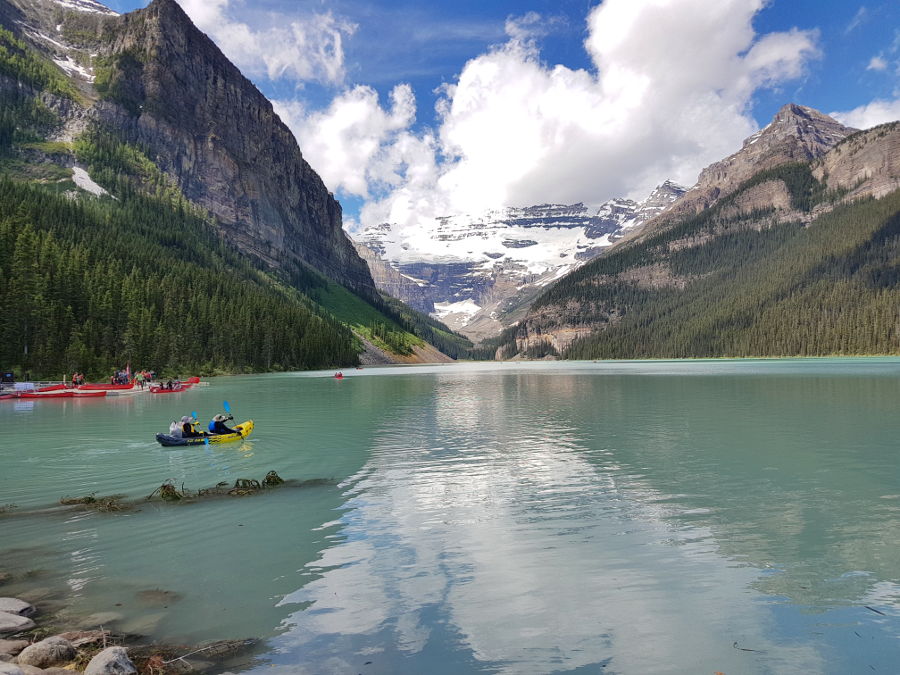
Next to Lake Moraine, Lake Louise is one of the most famous lakes in Canada. The lake is located in Banff National Park in the Canadian province of Alberta and is surrounded by the Rocky Mountains. With a size of 2 (1.24 miles) km long and 1 km (0.62 miles) wide, the lake is quite small. Depending on the weather and season, Lake Louise is sometimes deep blue and sometimes greenish turquoise. Thus, the appearance of the lake can change within a very short time. The lake gets its unique color from the so-called rock flour, which gets into the lake from the melt water of the surrounding glaciers. We were paddling on Lake Louise at the end of June and would like to give you the most important information if you are also planning a kayak tour on Lake Louise.
Key facts about the paddling tour
Duration
1 – 3 hours
Culture
no sights
Public transport
Bus
Traffic noise
no traffic noise
Landscape
azure water, stunning mountain scenery, surrounded by forests
Table of Contents
The best time for kayaking and canoeing on Lake Louise
Between mid-June and mid-September, kayaking or canoeing on the Lake Louise should be possible and the weather should also be suitable. Don’t forget that Lake Louise is a glacier lake at 1600 m (5250 feet) altitude and is often still frozen in May. We recommend to start your tour either in the early morning or in the late afternoon, or better in the early evening. This is especially recommended in the summer as the days are long and the sunrise and sunset create a particularly beautiful atmosphere. If you want to visit Lake Louise in the morning on a weekend, then it is better to be there between 7 and 8 AM., so that you can get a parking space or do not have to wait long for it. If there is no other time, you should plan more time and be prepared to find masses of tourists at the lake. Because during the high season, Lake Louise is very heavily visited by tourists on all days.
Canoe rental at Lake Louise and prices
If you want to rent a canoe, canoe rental is available from mid-June and depending on the weather until the end of September or beginning of October. The rental is open from 11 AM to 7 PM., with the last rental of boats at 6 PM. In the high season, the rental station sometimes opens earlier. The rental price for a canoe is outrageously high, $145 per hour / $135 per half hour (+tax). Hotel guests at the Chateau Lake Louise Hotel get a small discount, bypass the rental queues and can even rent canoes in the evening at 8:15 PM, thus bypassing the large crowds. This is not surprising though, as the hotel is the operator of the canoe rental. The canoe rental is the only canoe rental on the lake. Boats can also not be reserved in advance.
At Lake Louise there is only one canoe rental
Is it even worth renting a canoe? If the weather is good, it is an unforgettable experience to explore the lake and escape the crowds on the shore. A canoe can accommodate up to 3 adults, which then significantly reduces the price per person. We definitely recommend renting a canoe for at least an hour to avoid possible rush. Once you are on the water, you will immediately notice that the lake has something magical and invites you to relax.
We had the luxury of exploring Lake Louise with our own inflatable kayak. So we started early in the morning and were completely alone on the water. There are already inflatable kayaks around $150(e.g. Intex Explorer K2 or Challenger K2), which costs slightly more than the rent. The advantage is that you can start your tour earlier or later in the day, stay longer on the water and thus really explore the lake in peace and enjoy it to the fullest. There is more information in our inflatable kayak guide if you are interested in owning an inflatable kayak.
Let’s get to the actual route or tour on Lake Louise. Due to the small size of the lake, a route planning is not necessary. Nevertheless, we would like to share our route with you with numerous pictures, so that you get a small impression in advance, what to expect.
From the parking lot it is only a few 100 meters (300 feet) to the lake. The shore at the hotel is very well laid out with walkways. This walkway leads to the canoe station on the left side. At the front part of the walkway are most of the tourists to take a picture of themselves and Lake Louise. At this walkway you can also ideally start the paddling tour with your own kayak or canoe.
At the beginning of the tour the cloud cover was still very low over the lake
Nevertheless, we decided to paddle off
Mountain Big Beehive
We arrived at Lake Louise at 7 AM. It was on a Monday in June and there were very few people. We had spent the night before at the Lake Louise campground. We had left the tent set up and had breakfast at Lake Louise. From 8 AM it began gradually that more and more people came to the lake. Shortly after that it started to rain. Therefore we could start our tour only at 10 AM.
Camping at Lake Louise
There is a large campground on the outside the town Lake Louise. In the high season you should book a site in advance. There is one campground for RVs and one for tents and cars. Camping is relatively cheap compared to the hotels and lodges there. In addition, you are within a few minutes by car at the lake and can visit Lake Louise in the evening or early morning comfortably.
Shortly after the rain, there was no one else on the lake again. We decided to set up the boat and were within 15 min on the water. For many tourists we were a kind of attraction, because we were the only ones with our own kayak and then even the only ones paddling on Lake Louise. After not even 10 min we were far away from the shore and paddled along the left shore. We were lucky and the cloud cover broke. Even in the cloudy weather the lake had still had an incredibly beautiful atmosphere. Nevertheless, we could now see more and more of the mountains and they were immense. The passing of the clouds on the mountains was also unique to watch.
Impressive mountains at Lake Louise
We continued paddling along the left bank and the forest thinned out. The shore was now covered by an avalanche of boulders that looked like small stones from a distance. We stopped often while paddling to enjoy the mountain scenery.
We paddled to the end of the lake
In some places on the shore there was even snow at the end of June
At the end of the lake there was even snow on the shore. For the way back we took the shortest way. We recommend you to take more time for the first half of the tour, because we felt the landscape from the perspective much more beautiful. On the way back, the large hotel catches the eye. The forests and the distant mountains seem a bit monotonous compared to the scenic diversity enjoyed on the first part there. So the first half took us 1.5 h, the second part 30 min.
We found the first part more scenic
There are very few with their own boat on Lake Louise
Many wonder how long you should rent a canoe. Generally, one hour is enough to explore most of Lake Louise. Half an hour would definitely be too little. If you have the time and the budget, we recommend two hours. This is where having your own inflatable boat is an advantage. We had met a couple who also started a tour on Lake Louise after us with their own inflatable kayak (Intex Explorer K2). More information about the lake can be found on the page of the Banff National Park.
Other Activities in Banff
Banff National Park offers countless other opportunities for hiking and paddling enthusiasts. We would like to briefly introduce you to other activities we have done in the region.
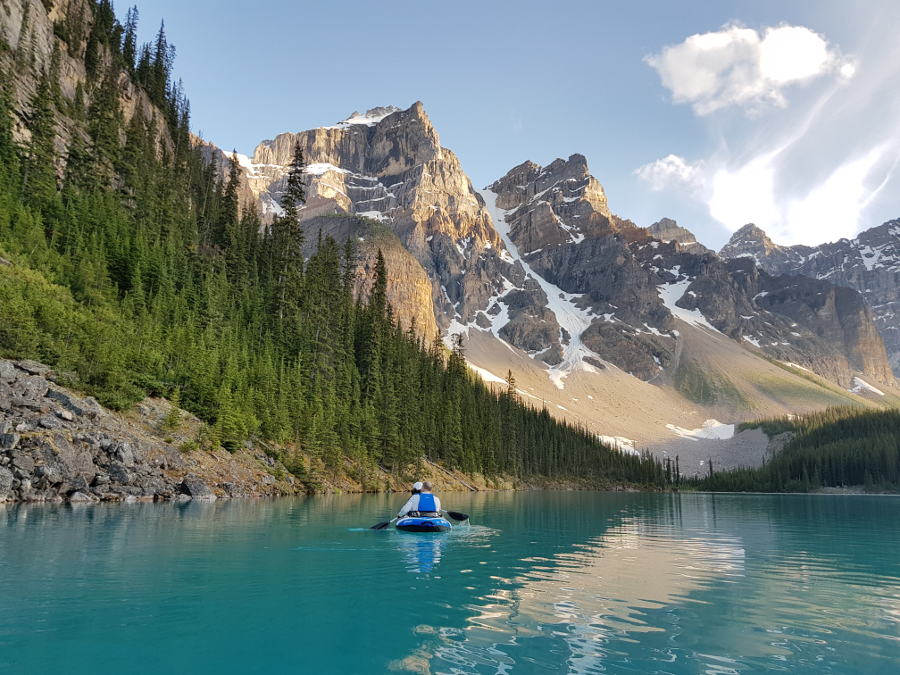
Paddling Lake Moraine
Just 20 km (12.5 miles) away is Lake Moraine, one of Canada’s most famous lakes. With its small size, it can also be paddled in a morning or afternoon. We paddled Lake Moraine on a summer evening and it was one of the best experiences of our Canadian trip. Read more in our tour report about Lake Moraine.
Icefield Parkway
A few miles north begins the Icefield Parkway, which connects the Banff and Jasper National Parks. The highway is considered one of the most beautiful roads in North America. We drove the Icefield Parkway in both directions and would not want to miss the experience. We were even lucky enough to see several black bears along the way.
Hiking the Sunshine Meadows Trail
The Sunshine Meadows Trail is said to be one of the most beautiful trails in Banff. Depending on the day, you can get to the trail either by gondola or by bus from Sunshine Village. On the website of Sunshine Meadows Banff you will find the exact departure information. At the top you will find small pretty lakes and well laid out hiking trails, which can be hiked in 3-4 hours. We can only recommend the hike, because it gives another insight into the mountains of Banff.
The itiwit canoe x500 is a full drop stitch canoe from Decathlon. The x500 is a canoe with two benches and a large seat cushion in the center, i.e. for two adults and two children. So far, there are only a few reviews on the web about such drop-stitch canoes. We had the opportunity to test this drop-stitch canoe extensively and would like to share our experiences with you in this review.
2 + 2 510 cm | 16’7” 100 cm | 3’3″ 250 kg | 551.2 lbs 100 x 45 x 38 cm | 3’3” x 1’5” x 1’2″ Drop-Stitch with PVC coating
Weight: Pressure: Produced in:
32 kg | 70.5 lbs 0.7 bar | 10 PSI China
Which model has been reviewed?
Itiwit x500 canoe from 2022
How did we organize the review?
The Itiwit x500 was provided to us by Decathlon, a French manufacturer and distributor of sports equipment and clothing. Itiwit is a brand for the paddle sport of Decathlon. Our review is independent of the manufacturer or shop and reflects our own opinion of the boat.
How intensively has the product been tested?
low
high 1 bar = 1-3 km paddled (first impressions) 2 bars = min. 1 day/ 2 half-day tours 3 bars = min. 4 tours 4 bars = min. 8 tours 5 bars = min. 12 tours (very intense)
Where have we tested the product?
Whitewater
Calm rivers
Lakes
Table of Contents
First impressions and assembly
Included with the Itiwit canoe is a trolley, more precisely, this is a transport bag with wheels. This rolling function is also necessary, because the canoe with 32kg weight on the back would hardly be transportable. The bag makes a solid impression and has several well-padded carrying handles, so that the bag can also be loaded by two.
Trolley included
Wheels of the trolley / transport bag
The canoe itself is compressed with a packing strap and folded several times. To assemble, the canoe is unfolded and the three separate air chambers are inflated one after the other to 10 PSI or 0.7 bar. The air chambers are inflated via spring valves that are easy to operate. They are similar to the valves of other high-quality inflatable canoes (e.g. Gumotex Palava, Gumotex Scout, Grabner Adventure).
For the assembly we used the Itiwit high pressure pump. There is also a successor to the pump that we recommend for this canoe, as this pump has a deflate function (more on this in the Dismantling section). Both of these air pumps are double action pumps. The first 5 PSI is pumped up with double stroke, meaning that air is pushed into the air chamber both when the piston is pushed down and when it is pulled up. Above 0.5 PSI, the double-stroke function is deactivated, so that air is only pumped into the chamber when pushing down. This is because the higher the pressure, the more difficult it is to raise the piston of the pump if air is still being pushed into the chamber at the same time. With the double stroke pump, the canoe was pumped up very quickly without much effort. Here, the thin drop-stitch air chambers are advantageous, as they require more pressure but less volume of air.
Itiwit canoe x500 folded
Itiwit canoe unfolded
Inflating the canoe
You can see two dents on one side chamber and another dent on the other side chamber. This is completely normal, because the valves are located there. To install the valves in manufacturing process, the threads of the drop stitch material must be cut at these points.
What is Drop-Stitch?
With the Drop-Stitch technology, the upper and lower inner walls of the air chamber are additionally woven with nylon threads. This is the only way to achieve a significantly higher air pressure than with air chambers without the tangled nylon threads. The air chamber thus achieves very good dimensional stability and rigidity. The Drop-Stitch technology is very common for SUP boards (Stand Paddling Boards) and is used more and more for inflatable kayaks. Learn more about this type of inflatable boats, in our buyer’s guide for Drop-Stitch kayaks.
The lower hull is additionally reinforced with PVC in the middle and rubber-like keel strips in the bow and stern areas to protect them from grounding in low water and when landing on the shore in the most stressed areas. In addition, under the keel strips at the bow and stern, there is an incorporated plastic strip inside the boat, which stiffens the area more and creates a sleeker bow and stern. It serves both as a tracking profile and to minimize water resistance when paddling.
The drop stitch material is made of polyester on the inside, which forms the threads for the drop stitch. The polyester is coated with PVC on the outside. How strong the PVC is, we can not say and could not find any information about it at Decathlon. Overall, the hull and interior is cleanly processed and glued.
bow shape of the Itiwit x500 canoe
Keel strip on the bow
The canoe has small spray covers at the bow and stern, but without any luggage net. Instead, there is plenty of room for luggage in the interior with many fastening options on the bottom. In the photo below, you can see again how thin the side walls are and how much the interior of the Itiwit x500 canoe resembles that of a rigid hull canoe.
There are also small mesh pockets for small items incorporated into the spray covers. In the front and in the back there is a plain carrying handle for transporting the assembled canoe.
Interior of the canoe, with the bench seats installed
After inflation, the only thing missing are the two bench seats and, as needed, the seat cushion for the children, which is firmly glued to the interior of the boat. The two bench seats are hooked into the front and back of the boat. Once you understand the principle, the bench seats are easy to hook in.
Compared to other inflatable canoes (e.g. Gumotex Palava, Gumotex Scout or Grabner Adventure) the positions of the bench seats are fixed. The bench seats are marked accordingly with “Rear Seat” and “Front Seat”, because they have a different width. The rear seat board (own weight of 1.55 kg / 3.4 lbs) has an average width of 52 cm / 1’7″ and the front seat board (own weight of 1.05 kg / 2.3 lbs) of 68 cm. Both have a depth of 25 cm / 8″. In addition, the seat boards have a foam insert in the middle as a kind of padding for the seat. The neatly finished bench seats are made of acacia wood and give the canoe an overall high-quality impression.
In addition, there are grooved treads in the interior in the area of the seat boards, as a kind of anti-slip function and additional protection of the drop-stitch material (for example, if you have kicked a sharp stone in the sole of your shoe).
Installation of the seat bench
Those paddling with children can inflate the drop-stitch air chamber in the center of the interior. It serves as a low bench seat for small children. The seat cushion is firmly glued to the floor chamber and thus cannot be removed. For children, this seating position seems ideal, as they sit lower and thus safer in the boat. Unfortunately, there is no third suspension in the middle for an additional seat bench (as in the Gumotex Palava, Scout, Grabner Adventure). So this canoe is a family canoe with small children or a canoe for camping trips of several days. However, there are drop-stitch canoes with three bench seats on the market (e.g. Verano CanCan, Extasea), but we haven’t paddled them ourselves yet.
Overall, the Itiwit Canoe x500 makes a very quality impression. It is very spacious, quick and easy to assemble and cleanly finished. We are curious to see how the canoe performs on and off the water.
Transportation of the canoe
On the way to the station and to the shore, the transport bag proved to be practical but not comfortable. The weight of the boat is too high for a transport bag with rolling function. After not even 5 minutes you have enough to push or pull the canoe and you get “long arms”. It works much better if a proper transport cart (e.g. Eckla Beach Rolley) is used in addition. With such a transport trolley, the transport also succeeds very well over a longer period of time.
The included transport bag with roll function is in our view especially suitable for users who want to roll the canoe only a few meters between home and car or from the parking to the lake or river nearby. Practical as with any Itiwit boat backpack is the holder for the air pump and the side pocket for the paddles on the outside of the bag.
The best way to transport the canoe is with a canoe transport cart
The instructions state that the assembled canoe should only be transported without luggage. We immediately felt when we wanted to carry the loaded canoe just a few meters to put it in the water. It immediately bends and the sidewalls lean outward. You only lift the bow and stern, so to speak, and the actual hull of the boat stays on the ground. So, to avoid damaging the boat, it was a case of unloading again, positioning it in shallow water and reloading. This is where the limitations of drop-stitch become apparent. A hard shell canoe could be lifted easily with enough muscle power. So you have to load the boat on the dock or in shallow water on the shore. Because in the loaded state you get the Itiwit canoe x500 as good as hardly moved.
Transferring the Itiwit canoe x500 with a canoe cart
The following has proven to be useful when transferring canoes on river trips at weirs and larger bottom ramps. Unload the canoe and put it on a canoe trolley. In the middle of the canoe, under which is directly the canoe cart, we then put the luggage back into the boat. So we didn’t have to transport the canoe from A to B first and then laboriously catch up with the luggage. Here we can already say, a canoe trolley makes double sense for the canoe, for the transport in the dismantled condition and for tranferring on river tours. Even unloaded a canoe cart is a real benefit because the Itiwit x500 canoe is pretty heavy and unwieldy.
Review of the Itiwit x500 canoe on the water
The experiences described are based on paddling with two people, including on a 3-day tour with camping gear in light whitewater, on a alpin lake and calm river sections. Paddling with one or two children, for which the canoe is advertised among other things, is not covered by this test.
Paddling performance and stability
We paddled with the Extrasea and the Itiwit canoe paddle. Both can be adjusted in length, and are thus optimally adaptable to one’s own needs (body size and boat).
From the running characteristics it resembles that of a hard shell canoe. The Itiwit canoe has a good straight running. However, depending on how both paddlers are used to paddle together, it may be necessary for the rear paddler to correct the course somewhat (for example, by using the paddle at the end of the stroke as a rudder).
The Itiwit x500 has good running characteristics for an inflatable canoe
In terms of speed, the Itiwit canoe cannot compete with a folding or hard shell canoe. If you paddle leisurely, you come to about 4.5 kmh / 2.8 mph. The maximum speed is 7.5 – 8 kmh / 4.7 – 5 mph, and both paddlers have to paddle vigorously and with a high frequency. You can feel the resistance of the water clearly at the bow. Paddling alone is possible, e.g. with J-stroke. On calm waters, however, progress is slow.
The rear bench seat is positioned sufficiently far back so that the rear paddler can easily correct the course or maneuver past obstacles early on rivers. If you have a good command of the bow stroke and the steering stroke, you will be able to maneuver the canoe safely even on fast-flowing rivers. When turning, however, you immediately notice the length and inertia of the canoe. It takes some more strokes of the paddle to turn it 180 degrees. However, this is common with large canoes.
Itiwit x500 canoe has a sufficiently high tipping stability
At the beginning, the Itiwit x500 canoe feels slightly tippy, but lies securely on the water. The tipping stability is lower than the Itiwit x100+ but significantly higher than the Itiwit x500 kayak. On a 3-day canoe trip including light whitewater portion we had no situation where we almost capsized.
Seat comfort
Although the seat boards have a fixed position (like a hard shell canoe), the positions of the seat boards are well chosen. Each paddler has enough space and legroom. The seat height is also well chosen from our point of view.
The bench seats have a good height
Unfortunately, the seat boards are only hooked in and not secured against loss. So in the event of a capsize, a board can get lost, which would be annoying. When paddling, however, we did not have the problem that a seat board had come loose from the suspension. We sat on the seat boards (76 kg / 167.5 lbs and 85 kg / 187.4 lbs) safely and stably, even though they are only hooked onto straps. Paddling in a kneeling position is also well possible. Also, the attachment of the suspension loops on the boat wall are attached high quality.
On long tours, a seat cushion is recommended for improved seating comfort
The upholstery of the seat boards, on the other hand, has only a very small effect on comfort. For example, the padding of the seat boards of the Gumotex Palava or Scout is much better. On longer trips of several hours, we recommend using a small seat cushion with the Itiwit canoe. We have used a flat inflatable seat cushion for this purpose, which significantly increases the seating comfort and thus allows comfortable sitting throughout the day.
Luggage load and attachment
The disadvantage of previous inflatable canoes was the limited load space due to the voluminous side air chambers, which significantly reduce the interior space. This disadvantage is eliminated by the use of Drop-Stitch, because thin side walls are possible with this material.
A small disadvantage of Drop-Stitch compared to classic air chambers is the lower air buoyancy, so that for this canoe there is a maximum payload of 250 kg / 551 lbs. Classic inflatable canoes manage a payload of up to 450 kg / 992 lbs.
A drop stitch canoe offers a very generous interior space
very much space, e.g. for a multi-day tour
Classic inflatable canoes offer significantly less interior space
The outer appearance of the Itiwit canoe is almost identical to that of a hard shell canoe. Due to the thin side walls, you have as much space in the Itiwit canoe as in a conventional hard shell or folding canoe. It is no problem to stow a folded boat trolley or a large backpack in the interior. In addition, there are numerous attachment loops in the interior for securing luggage. For larger luggage we use 3m long tension straps with clamp lock and rubber cover, with which bulky luggage can be secured to the floor very well. For small luggage (e.g. for the attachment of Itiwit luggage canisters) the canoe already comes with two tension straps.
Fastening the luggage to the floor
No luggage net but small luggage compartments at the bow and stern
Another storage compartment below the mesh pocket
There are also stowage options on and under the spraydeck at the bow and stern to store small utensils (e.g. bars, sunscreen, small towel, etc.) that should be quickly at hand on the water. However, valuables should not be stowed there, as the pockets are not completely closable. It is a pity that there is not a single D-ring in the bow and stern to securely fasten a small dry bag.
Dismantling the Itiwit x500 canoe
Even if the boat skin can be wiped dry, the carrying handles and the luggage loops in the interior are soaked after a long tour with a lot of getting in and out (e.g. during transfers or breaks) and must be allowed to air dry. If you have taken your canoe through rapids, you may also have wetness in the interior. This is because at the top of the boat, where the carrying handles are located, it is not completely sealed. On the other hand, if you’re doing quiet river or lake recreational tours and don’t put the canoe in the water from steep bank, you won’t have to expect water ingress around the carry handles.
In addition, the carrying handles and the light interior are quite susceptible to dirt. The drop stitch material is very easy to clean of dirt. Dirty discolorations remain on the carrying handles and the grooved treads in the interior (we have not yet tried a clean scrubbing with soap).
Moisture under the spray deck covers
carry handle on the bow
Not everything in the interior is easy to wipe dry and clean
For dismantling, the canoe must be folded exactly as described in the manual and the remaining air must be pressed out of the air chambers or, ideally, pumped out with the correct air pump (e.g. Itiwit high-pressure pump with deflation function), because otherwise the canoe will not fit the transport bag. Markings on the boat skin “Fold here” help to fold the boat in the right place. It is best to fold it in pairs. Alone, it takes even more patience and practice to get it back into the bag.
Strengths and weaknesses of the Itiwit x500 canoe
Classic inflatable canoes have the disadvantage of less space. Folding canoes require a much longer assembly. hard shell canoes require sufficient space at home for storage and cannot be transported by public transport. These disadvantages no longer exist with the Itiwit canoe, which is its greatest strength. It can be transported without much effort, quickly assembled and offers a spacious interior.
The running characteristics are good, but do not come close to those of a hard shell or folding canoe. The canoe is still well transportable with the included transport bag with roll function, but still heavy at 32 kg for a portable boat. For longer transport distances and transfers on river tours, we recommend the use of a canoe trolley. It is also a pity that no third bench seat can be mounted optionally. Thus, using the canoe with three adults is out of the question.
A nice canoe for multi-day trips for two or family trips
Advantages
+ very fast and easy assembly + good workmanship + very spacious interior + bench seat for children included + many fastening loops in the interior for securing luggage + good running characteristics for an inflatable canoe + small luggage compartments at the bow and stern + bag with roll function included + high-quality benches + good price-performance ratio + bottom of the hull as well as bow and stern additionally reinforced
Disadvantages
– foam padding of the seat boards have only a small effect on the seating comfort – seat boards are only hooked in and are therefore not secured against loss – dirt-prone interior – uncomfortable transport despite rolling bag – packing requires an air pump with deflate function and some practice – not designed as a 3-person canoe although the canoe would be large enough (because no possibility to attach a 3rd bench and limit the load to 250 kg)
On a camping trip for several days with the Itiwit canoe x500
Conclusion on the Itiwit x500 canoe
Decathlon has succeeded with the Itiwit canoe x500 a nice canoe for family trips and multi-day canoe trips with camping. It offers a lot of space inside. Just load everything in without having to play Tetris. Large luggage can be fixed well in the interior without disturbing the paddlers. So nothing stands in the way of a family trip or camping trip lasting several days.
It is a real pity that the canoe cannot be equipped with an optional third bench seat in the middle. If necessary, the construction of the canoe does not even allow a bench seat for another person to be hooked into the widest, most unstable part of the canoe. The bench would have to be almost a meter wide. In addition, with three adults and luggage, the load limit of 250 kg would quickly be reached.
However, anyone paddling with children will be all the more pleased with the low bench seat in the form of another air chamber that is permanently integrated into the boat. The children sit much more securely in the boat than on a suspended bench seat. For families who like to travel with a canoe, the Itiwit canoe x500 is thus a good choice. Thanks to the quick assembly, you are on the water very quickly. When not in use, the canoe takes up hardly any space for storage at home.
If you don’t need the middle seat, you can leave it uninflated and stow luggage there unimpeded. For one-day tours for two, however, we would personally use a classic inflatable canoe, which are more compact and sometimes cheaper and, depending on the model, even more robust.
The Aqua Marina Steam 412 is an inflatable kayak with drop-stitch floor. This is the new edition of the Aqua Marina Steam 412 from 2022. Compared to its previous model, not only the color scheme has changed, but also the width, capacity, spray covers and much more. The manufacturer even speaks of improved running characteristics.
For a 2-person drop-stitch kayak in the upper entry-level segment, it has a decent length of over 4m, has a footrest for both paddlers and two large fins. These are all aspects that should speak for good running characteristics. In addition to that, space and seating comfort are also crucial. In this review, we are interested in whether the inflatable kayak is more than just a beginner’s boat, i.e. whether you can also paddle longer tours with it in the summer and if it’s also an option for beginners with higher demands.
15.5 kg | 34.2 lbs 0.1 bar | 1.45 PSI (sides), 0.3 bar | 4.35 PSI (floor)
Produced in:
China
Which model has been reviewed?
Aqua Marina Steam 412 from 2022
How did we organize the review?
The Aqua Marina Tomahawk was provided to us on a rental basis by Arts-Outdoors, a store and online shop for outdoor gear. Our review is independent of the manufacturer or store and reflects our own opinion of the boat.
How intensively has the product been tested?
low
high 1 bar = 1-3 km paddled (first impressions) 2 bars = min. 1 day/ 2 half-day tours 3 bars = min. 4 tours 4 bars = min. 8 tours 5 bars = min. 12 tours (very intense)
Where have we tested the product?
Whitewater
Calm rivers
Lakes
Table of Contents
Assembly and first impressions
The Aqua Marina Steam 412 makes a pretty compact impression when packed. On the other hand, the foam seats are quite bulky. The package includes a compact air pump with an integrated pressure gauge, a 10-liter dry bag, two large directional fins, repair materials, a water guard for the bow, a valve wrench and a solid transport backpack.
In total, the kayak with accessories weighs 15.5 kg (34.2 lbs) and can be easily transported in the included transport backpack. The backpack has padded shoulder straps, a simple chest and hip belt, and a large mesh pocket on the side for paddles or other accessories. The very simple waist strap is unnecessary in our view, as it is only a narrow strap and the click closure is pretty uncomfortable. Even without using the waist or chest strap, the kayak is very comfortable to carry in the included backpack. The side mesh pocket is nicely sized to fit two double paddles without squeezing.
If you pack the kayak well, you can easily fit the air pump and optionally two life jackets in the backpack. The backpack could be a little more robust overall from the material. After the second paddling tour, there was already a small hole in the fabric, which will be unavoidable in the long run. The previous model only came in a simple carrying bag, so that the perfectly fitting transport backpack alone is a really good upgrade.
A transport backpack is already included.
To assemble the kayak, we first start by inserting the Drop-Stitch floor into the boat. The Drop-Stitch floor is quite narrow and has two cut-outs on both sides. The cut-outs are a good guide to whether the drop-stitch floor is positioned correctly in the boat. The cut-outs are there to expose the drain openings. However, on sea and calm river trips, the drain holes remain closed.
The drop-stitch floor is a separate element
Before inflating the floor needs to be inserted
Kayak with the inserted floor
What is Drop-Stitch?
With drop stitch technology, the upper and lower inner walls of the air chamber are additionally interwoven with textile threads. This makes it possible to achieve a significantly higher air pressure than with air chambers without the interwoven threads. The air chamber thus achieves very high form stability and rigidity. The drop stitch technology is very common in SUP boards (stand paddling boards) and is used more and more in inflatable kayaks. Learn more about it in our article about drop-stitch kayaks.
We noticed that the drop stitch is not glued cleanly in some places. Small unsightly spots where the glue is not clean are often found on boats produced in China and are not functionally critical. Nevertheless, these spots on our test model are clearly more than what we know. Even if it should not have any functional effects, this is a pity for a new product.
Closed drain openings on the floor
Unclean finishing on the drop stitch base
Now the side chambers can be inflated. The valves are spring valves. When inflating, the pin must stick out. Then the valve adapter of the air pump can be screwed on. The air chamber is quickly inflated, as it requires only 0.1 bar (1.45 PSI) and has a smaller diameter compared to other inflatable boats.
After the two side chambers are inflated, the drop stitch air chamber follows. This is also quickly inflated. The drop stitch is inflated to 0.3 bar (4.35 PSI), which is not much for a drop stitch air chamber.
Although a little air escapes from the pump during inflation and the double stroke pump is quite small, inflation was very quick and easy.
Inflating the kayak with the included air pump
Pressure gauge for measuring the air pressure
There are a total of 3 spring valves
Admittedly, the air pressure of the air chambers for an inflatable kayak with an insertable drop-stitch floor is lower than average. The cheaper Itiwit x100+ even holds 0.2 bar (2.9 PSI) in the side chambers and 0.35 bar (5.1 PSI) in the drop-stitch floor. The lower air pressure in the Aqua Marina Steam, especially the air pressure in the side chambers, makes a noticeable difference on the dimensional stability and stiffness of the kayak. Compared to the drop-stitch floor, the rest of the hull with its side chambers has a very good finish.
Water guard, which stretches the spraydeck of the bow
For additional protection against waves that would otherwise come splashing into the boat from the front, the front spraydeck can be stretched with a plastic part as a kind of wave/water guard. If then a wave comes on the bow, the water does not run into the interior but sideways off.
Inserting the seats
Attaching the seat with carabiner
Then the seats are inserted into the boat. To do this, the seats are fixed to the floor using Velcro. The backrest is attached to D-rings on the side chambers with four carabiners. The D-rings make a high-quality impression and are double reinforced on the side chamber. The advantage of the carabiners is that you don’t have to adjust the straps again on the next trip.
The upper straps of the backrest are attached to the side chambers in front of the seat and the lower straps are attached to the side chambers behind the seat. This way, the backrest cannot fold forward or backward. The upper straps can also be used to readjust the individual position of the backrest.
The footrests are already mounted in the interior. We try it out and we (1.89 m / 6’22” and 1.76 m / 5’77”) immediately notice that for us the distance between seat and footrest is clearly too small on both seats. Both footrests have two positions, and the footrests are already attached to the outer tabs. So we could only move the footrests closer to us, which doesn’t help.
Maximum legroom with footrest (front)
Maximum legroom with footrest (rear)
Removal of the footrest
So we place both seats much further back in the boat to create more space, because there is still enough room behind the second seat. However, the problem now is that the upper straps of the backrests are not long enough. We checked the manual again to make sure we installed the seats correctly. Also, the straps of both seats have the same length, so they have not been switched either. If we attached the lower straps of the backrest (which are actually a bit longer) in the front, the backrest would barely provide any support.
That is pretty annoying. A few more attachment loops on the floor for the footrest and longer straps on the backrest would have solved the problem. Presumably, the kayak was designed for markets where people are much smaller. So, without further ado, we decide not to use the footrests and remove them.
At the back of each seat there is a small pocket and two mesh pockets in the form of a drink holder, which is very practical for a leisurely tour in the summer.
Cup holder and small pocket on the backrest
After that, we mount the two fins on the bottom of the kayak, which should provide a better straight running characteristics. Do not mount the fins on the boat until you are done with the seats and footrests.
Plugging in the direction fin
In the photo you can see how narrow the drop-stitch floor is. You can also see that the kayak has a high rocker. In addition, both the bow and stern have plastic caps to better protect the kayak in case of collisions.
Hull of the Aqua Marina Steam 412
Furthermore, the Aqua Marina Steam 412 has a total of 4 carrying handles, one each at the bow and stern as well as centrally on the side chambers. This allows you to carry the kayak both alone and with another to the water. If you want to store some luggage (e.g. the included 10 liter dry bag), you can use the luggage net at the stern.
Luggage stowage
10 liter dry bag (included)
Furthermore, the Aqua Marina Steam 412 has a total of 4 carrying handles, one each at the bow and stern and centrally on the side tubes. This allows one to carry the kayak both alone and in pairs to the water.
Das Aqua Marina Steam 412 lässt sich zu zweit
… and also transport well alone to water
Rewiev on the water of the Aqua Marina Steam
The entry is easy and turns out to be pleasant and safe due to the firm drop-stitch floor, even if it is “only” 0.3 bar (4.35 PSI). However, the two fins ensure that the boat must be placed in parallel with the shore. With the bow to the shore it works less well, because otherwise you would get stuck with the front fin. When landing on the shore, you should also keep in mind not to paddle the kayak directly onto the shore, otherwise you will touch the ground. Rather, position the kayak in parallel just before landing and then get out. Alternatively, you could leave out the front fin. However, we are interested in the paddling characteristics with the two fins.
There is not much legroom for tall people
Our first tour with the Aqua Marina Steam takes place on a cloudy and slightly rainy day on a lake. After a short time we are positively surprised by the driving characteristics. Although the kayak has a high rocker, it runs well for a kayak in this price range. We have the feeling that we are making good progress on the lake. Speeds between 5.7 (3.5 mph) and 6.2 km/h (3.85 mph) are no problem with a normal paddle stroke.
We also like the straight running characteristics quite a lot. The kayak runs much better straight than expected. When both stop paddling, it doesn’t drift right away. It takes a while and drifts only slowly. This is where the two large fins make a difference. Despite good straight running, the maneuverability on the lake is also good. The kayak can be maneuvered easily and quickly. In terms of handling characteristics, it offers more than the Itiwit x100+ 2-seater.
Paddling the Aqua Marina Steam 412 on a lake
The paddler in the back does not miss the footrest when paddling, as he can rest well on the backrest of the front seat without disturbing the other paddler. Nevertheless, there could be more legroom. Tall people (I sat in the back at 1.89 m and had the seat positioned as far back as possible) have to angle their legs too much. Unless the front person is shorter, so the front seat can be positioned further forward.
For the front paddler, a footrest would definitely be a nice feature on a longer trip, especially since you expect to be able to use a footrest when you buy the kayak. This only works if you’re shorter. If both paddlers are perhaps only 1.60 m (5’25”), it could probably work. Of course, in the end, it depends primarily on seat length, not height. If the use of a footrest is important to you, sit at home to test it before you go out on the water. However, for small leisurely paddling trips (with 2-3 h of paddling), you can safely do without a footrest, especially since the footrest is also just a kind of bar.
Although we had only small waves on the lake, the one or other wave came in the front side of the boat. What is noticeable is that the side walls are quite low. Probably, this is a possible reason why the one or other small wave came into the interior faster. Fortunately, the water in the boat gathers under the drop-stitch floor and in the cut-outs where the drain openings are located. So you don’t have water standing directly in the boat. In addition, the seat cushions are thick enough that you wouldn’t be sitting with your bottom right in the wet. Also, the seats stay in place and do not slip away. Overall, the seats offer a good seating comfort, especially the backrest gives a good support when paddling.
Paddling the Aqua Marina Steam on a river
Soft side chambers
The spray skirt hold well and tightly to the coaming.
On a river tour, we were convinced by the kayak’s tipping stability. Although it is not as stable as the Itiwit x100+, it still offers a sufficiently high tipping stability, so that even beginners feel comfortable in the Aqua Marina Steam.
We were particularly struck by the kayak’s low stiffness. If you lean on the side tubes to sit properly in the seat, the air chambers give way quite a bit on the one hand, and on the other hand you push the boat apart a bit. This is only known from cheaper boats, but not from drop-stitch kayaks. The kayak also sagged during the transfers due to the low air pressure. There are other reasons for this: First, the air pressure decreases in cold water and second, there was some water in the boat because some splash water got into the boat. With a Gumotex boat with similar dimensions (e.g. Gumotex Solar or Gumotex Swing 2, both with 0.2 bar / 2.9 PSI in the side chambers and in the bottom chamber) we never had the problem that during a transfer the boat sags to the bottom.
It is a pity that the narrow insertable drop-stitch floor is not attached to the actual boat hull (e.g. via two straps as on the Itiwit x100+). So we noticed that in the event of a capsize or too much water in the boat, the drop-stitch floor can be pushed up and come loose.
On river trips with low water levels, where unsightly groundings are to be expected more often, it is better not to attach the fins. Otherwise there is a risk that your kayak will often touch down or even get stuck. This happened on a river tour with the Aqua Marina Steam. The consequence is that you have to get out. One fin even broke off on the Aqua Marina Steam. This shows that the fin is made of a plastic that is too inelastic.
broken fin
Meanwhile, many 2-person inflatable kayaks can be reconfigured so that you can paddle the kayak very well alone. Aqua Marina does not offer this option. Rightly so! Because there are no separate attachment points for the footrest and seat for the 1-person configuration. Nevertheless, it was possible to attach the backrest so that it provides sufficient support while paddling. We definitely miss a footrest here then. Also, the kayak has more rocker, the waterline is shorter and the running characteristics decrease noticeably. The kayak is not designed for this, but you can still take it for a leisurely short paddle tour. However, we personally wouldn’t want to paddle with it for more than half an hour or at most an hour in this configuration (unless you let yourself drift down a river with just a few paddle strokes).
The Aqua Marina Steam 412 is not designed for single usages
Nevertheless, it can also be paddled alone for short distances
The Aqua Marina Steam has, among other things, the rocker and the many drain plugs to be able to use it better in white water. The kayak is even advertised for use up to whitewater level 3, to possibly suggest a higher value!? The kayak has in any case a sufficiently high tilt stability (but less than compared to the Itiwit x100+), but personally we would not paddle with the kayak in white water level 3. For white water level 3 it needs thigh straps and reasonable foot support, where not the heels but the balls of the feet can be put on. A self-bailer function through the numerous drain openings is in our view not yet an argument to be able to use the kayak safely in WW3. In addition, the narrow drop-stitch floor is only inserted in the boat and is not attached anywhere. In the event of a capsize, it could come loose. Last but not least, it should not be forgotten that whitewater has a very low water temperature most of the time. The side chambers would become even softer due to the low water temperature, so reinflation is necessary.
Dismantling the Aqua Marina Steam 412
The kayak is as easy and quick to dismantle as it is to assemble. The boat is easy to wipe dry and put back together. It went without problems everything back into the transport backpack.
Drying the interior
Water, which stands in the interior of the boat, can be very easily emptied via the drain plug in the stern or bow. If the seats are wet, they must be dried in the air.
Strengths and weaknesses of the Aqua Marina Steam
We liked the simple and quick assembly as well as the running characteristics best. The running characteristics are not comparable with an Itiwit x500, nortik scubi 1 XL or Advanced Elements AdvancedFrame Convertible Elite, but they are better than expected for this price range.
We were disappointed by the positioning of the seats and footrests. In addition, we would have expected a higher stiffness for a kayak in this price range, because the side chambers allow only 0.1 bar (1.45 PSI).
Advantages
+ good running characteristics (good speed, nice straight running in this price range, good maneuverability) + sure-footed when entering due to the insertable drop-stitch floor + compact air pump with integrated pressure gauge included + very quick and easy assembly/disassembly + good seats + numerous carrying handles and luggage net with cord for lashing luggage + good transport backpack included + bow and stern additionally protected
Disadvantages
Low stiffness (among other things because of side chamber only up to 0.1 bar (1.45 PSI) and narrow drop-stitch floor) – seats can only be positioned in the boat to a limited extent (thus little legroom for large paddlers) – despite splash guard panel, little splash water protection due to low side walls – footrests can only be used by small people – drop-stitch floor partially glued uncleanly – seats must dry separately and cannot simply be wiped dry – not very useful as a 1-person kayak – directional fins break easily with intensive ground contact – unsuitable as a whitewater kayak (up to whitewater level 3 as specified) from our point of view (no reasonable support via footrests and thigh straps, insertable drop-stitch floor is not fixed to the hull, . ..) – Locking caps of the drain plugs can quickly open during transfers
Aqua Marina Steam 412
Conclusion on the Aqua Marina Steam Drop-Stitch kayak
With the rocker and the drain plugs, as well as the longer design and the two large fins, Aqua Marina wanted to bring a real all-rounder to the market with the Steam 412, which can be used both for white water and for lakes and calm rivers. The driving characteristics of the kayak convinced us for this price range in calm waters. In white water, we would use the kayak only up to white water level 1, despite the steering option. Unfortunately, it is not an all-rounder in terms of seat configuration (i.e. reconfigurable as a 1-seater kayak), as the separate attachment points for seat and footrest in the boat are missing.
What also disappointed us is the positioning of the seats and footrests in the 2-person configuration, which is what the kayak is actually intended for. The footrests can’t be positioned far enough forward, and the backrest straps are too short to place the seats far enough back. So the use of the footrest is reserved for shorter people. This is actually a pity, because there would be enough room for two tall adults in the inflatable kayak. If you only want to go on short, leisurely tours, the lack of a footrest won’t bother you. On the other hand, those who plan extended day trips should not neglect this aspect.
Also, we would have expected a kayak with an insertable drop-stitch floor to have a higher overall steadiness. The side chambers are quite soft at 0.1 bar (1.45 PSI). Even a kayak (e.g. Itiwit Touring) with 0.1 bar (1.45 PSI) and a polyester shell makes a more stable impression overall. The hull is overall cleanly glued. However, we could determine a few unclean glued joints at some points of the drop-stitch bottom.
The Aqua Marina Tomahawk Air-K 440 is an open 2-person full drop stitch kayak, i.e. both the bottom and the side chambers are made of drop stitch material. The construction method makes the kayak look like a hardshell kayak, because you won’t find voluminous air chambers in the Tomahawk. Aqua Marina is not the only brand of full drop-stitch kayaks, as full drop-stitch kayaks have been on the market for several years and in recent years this type of inflatable kayak has become increasingly popular. Among the Aqua Marina kayaks, the Tomahawk is one of the most popular kayaks of the brand. We have tested the Aqua Marina Tomahawk and would like to share our experiences with you in this review.
2 440 cm | 14’4” 78 cm | 2’6″ 210 kg | 44.8 lbs 100 x 60 x 33cm | 3’3” x 2” x 1’1”
Material:
Drop-stitch material with PVC coating
Weight: Pressure: Produced in:
20.3 kg | 44.8 lbs 0.68 bar | 10 PSI China
Which model has been reviewed?
Aqua Marina Tomahawk Air-K 440 from 2022
How did we organize the review?
The Aqua Marina Tomahawk was provided to us on a rental basis by Arts-Outdoors, a store and online shop for outdoor gear. Our review is independent of the manufacturer or store and reflects our own opinion of the boat.
How intensively has the product been tested?
low
high 1 bar = 1-3 km paddled (first impressions) 2 bars = min. 1 day/ 2 half-day tours 3 bars = min. 4 tours 4 bars = min. 8 tours 5 bars = min. 12 tours (very intense)
Where have we tested the product?
Whitewater
Calm rivers
Lakes
Table of Contents
First impressions and assembly
The kayak is supplied with a transport backpack. The big advantage is not only that you do not have to buy an additional transport bag, but that you already have a bag that is perfectly suited for the boat.
The backpack of the Aqua Marina Tomahawk can be opened all around via a zipper. This large opening ensures that you can easily pack and unpack backpack. On one side of the backpack there is also a side pocket. Such side pockets are good for stowing multi-part paddles (paddles are not included in the package and must be purchased extra). Unfortunately, only one four-piece paddle fits in the side pocket of the Tomahawk backpack. The second must be stowed in the main compartment or in a separate bag. The shoulder straps of the backpack are lightly padded. For the storage of the kayak and short transport distances, the backpack is more than enough. However, if the way to the next station is longer than 10 minutes, we would have liked a hip belt and more padded shoulder straps due to the high weight. For example, the backpack from the Aqua Marina Steam is better padded, although the Steam is lighter. Overall, the backpack is a nice addition from the manufacturer. However, if you want to transport the boat over longer distances on your back, you are probably better off with a higher-quality backpack.
Supplied transport backpack
Pack size of the kayak
In total, the kayak is 4.4m long
The Aqua Marina Tomahawk, almost like any full drop-stitch kayak, is quite bulky and heavy with its PVC coating (the Tahe Breeze is an exception in the segment with a simple PVC coating). For example, a Gumotex Seawave made of polyester coated with rubber with similar dimensions is much more compact and partly lighter than a full drop-stitch kayak.
Unpacked, the Aqua Marina Tomahawk appears with a length of 4.40 m pretty long, slim dimensioned and streamlined. From the first impression, the drop stitch kayak makes a high-quality impression. The Drop-Stitch material consists of a polyester fabric and 2 PVC layers as a coating.
In addition to the transport backpack, there is a high-pressure air pump with an integrated pressure gauge in the scope of delivery. It has a single and double action function. You use the double action function at the beginning, whereby you pump air into the air chambers during both the downward and upward movement. This way you quickly get maximum air within minimum time into the chambers. When you have reached a certain high air pressure, pumping with the Double Action function quickly becomes exhausting. Then switch to the Single Action function. With this function, only air is pumped into the air chambers during downward movement, and pumping becomes easier again when the air pressure is high. In addition, two solid kayak seats, two footrests, two fins, a valve wrench and repair materials are included in the package.
The Tomahawk consists of 3 separate air chambers, each has a spring valve. The valve cap is unscrewed, the pin of the spring is pushed out and the adapter of the air pump is put on. After that the pumping starts. You can read the air pressure directly from the pressure gauge on the air pump during inflation. Each air chamber must be pumped up to 0.68 bar / 10 PSI, which is a common value for a full drop-stitch kayak. Inflating is really easy and fast. Without much effort, the inflatable kayak with its flat air chambers is inflated after a very short time. The side chambers and the bottom have a thickness of 7 cm when inflated.
The high pressure pump is already included in the scope of delivery
The kayak has 3 valves
The air pump has a pressure gauge
Now that the boat is inflated, the seats are placed into the boat. These are solid seats. The seat cushion is attached to the Velcro strip, which is located on the floor inside the boat. This is to prevent the seat cushion from slipping while paddling on the water. The backrest is attached to D-rings on the side chambers with four carabiners. The D-rings make a high-quality impression and are double reinforced on the side chamber. The advantage of the carabiners is that you do not have to adjust the straps again on the next kayak tour.
The upper straps of the backrest are attached to the side chambers in front of the seat and the lower straps are attached to the side chambers behind the seat. This prevents the backrest from folding forward or backward. The upper straps can also be used to readjust the individual position of the backrest. In addition, there is a small simple pocket at the back of the backrest for storing utensils, such as sunscreen or snacks (not waterproof and also not completely closable. Items can be lost in the event of a capsize).
Inserting the seats
Mounting the backrest
Once the seats are positioned, the next step is to install the footrests, which do not differ for the front and rear seats. Both footrests have two straps each, which are threaded through the D-rings on the side chambers. The straps are then closed via a bar buckle or ladder buckle and adjusted in terms of length. We especially find adjusting the length of the straps via the bar buckles cumbersome and annoying.
It is also noticeable that some space in the bow is wasted as potential footwell. The footrest is too wide and the bow too narrow to position the footrest further into the bow. We (1.86 and 1.89) therefore had to move the front and rear seat significantly backwards, so that both paddlers have enough space. Of course, you give away some space in the stern to store luggage and equipment.
Attaching the footrest
Max. position for the front footrest
Correctly adjusted footrest
After the seats and footrests have been adjusted to suit your needs, the fins can be slid into the two slide-in boxes provided on the underside of the boat and secured with a cotter pin. The fins are relatively heavy compared to fins of other air kayaks.
A directional fin provides better straight-line tracking and is very common on inflatable kayaks, but two fins of this size are rare to find. We are curious to see how good the straight running of the Aqua Marina Tomahawk will be.
For additional protection against waves that would otherwise slosh into the boat from the front, the front spraydeck can be stretched with a plastic part as a kind of wave/water deflector. If then a wave comes on the bow, the water does not run into the interior.
Mounting the fins
Inserting the water splash guard
Kayak hull
A hard-shell element is incorporated at the end of the bow and stern respectively, shaping the ends of the kayak well and protecting the air chambers in case of contact with shore or rocks.
Besides the carrying handles and the safety loops at the bow and stern, there is unfortunately no luggage net or similar. Many inflatable kayaks with an open cockpit (e.g. Tahe Breeze, Aqua Marina Steam, Gumotex Solar, Itiwit x100+, …) have a luggage net at the stern to securely attach luggage so that it does not take up space in the interior. Unfortunately, the Tomahawk does not have such a luggage net. The spraydeck at the stern of the Tomahawk is also quite small. This at least has the advantage of stowing a larger backpack or pack behind the second seat and making it easier to get into the corners when drying. For stowing luggage inside, some manufacturers like to work with D-rings on the floor so that the luggage can be secured. But even for such features to secure luggage, you look for the Aqua Marina Tomahawk in vain.
Tomahawk Air-K 440 as 1-person configuration
Although Aqua Marina advertises the 1-person configuration on the Air-K 440, the kayak is only half-heartedly designed for this configuration. For the 1-person configuration, there are no Velcro strips and no additional D-rings to secure the seat in the center of the interior. Instead, the D-rings of the 2-person configuration are used. We’ll go into how well this works on the water in the section below.
Review of the Aqua Marina Tomahawk on the water
The Aqua Marina Tomahawk has a total of four carrying handles. The carrying handles at the bow and stern are ideal for transporting the kayak to the water or transferring the kayak in pairs on river tours. More than lightly loaded (small daypack in the boat) we would not carry the boat with the handles, however.
If you are traveling alone, you can use the carrying handles in the middle on the inside of the side walls. This shows how unwieldy such a long boat can be. Nevertheless, the handles are absolutely sufficient to put the Tomahawk alone at short distance into the water.
Carrying handles in the middle
Carrying handles at the bow and stern
Due to the open cockpit, entry is very easy. The two directional fins can be annoying on the shore. If you get in too shallow water, they tend to stick to the ground, so that you can’t get off the spot. This is partly because the fins are pretty long and there is a fin in the front as well as in the back. It is better to place the boat in the water sideways to the shore or to enter via landing stage. Alternatively, you can also leave a fin off so that the entry on the shore works better.
Despite tippiness, the kayak has a late capsize point
When paddling the Tomahawk, it is immediately noticeable at the beginning that it feels very tippy at first, as if it would tip over at the next movement. If you trust the boat and give it some time, you will be rewarded. The drop-stitch kayak is tippy, but the stability of the kayak on the water is much higher than felt at the beginning and the actual capsize point comes very late. We have challenged several capsizes on summer tours. We were surprised how late the kayak actually capsizes then. Before it tips over, it literally continues on the sidewall. If you’re fit or athletic, you’ll also manage to get out of the water back into the kayak without any problems.
If you are timid, you will not like the Tomahawk. There are much more stable inflatable kayaks on the market (e.g. Aqua Marina Steam 412, Advanced Elements Advanced Frame Convertible, Itiwit x100+ 2-seater, Gumotex Thaya, …). This aspect should not be neglected in a 2-person kayak. If you want to paddle with your partner or friends who may have never paddled before, it is easier to win them to the new activity if they feel safety and comfort at the beginning. Also, in a 2-person kayak, there are always two people who need to find the right balance together. Finding this joint balance is more important in a tippier kayak than in, for example, an Itiwit x100+ or Gumotex Thaya, which hardly tilt at all when there are unsteady movements in the boat.
Very good gliding properties and good straight running
Speeds of 6 to 7 km/h during leisurely paddling for two are possible without any problems. The kayak accelerates very well and has a good glide with only a very small bow wave. Overall, the trim of the kayak is really good on the water and forms a nice long waterline.
With the two fins, the straight line runout is also very good. If both people stop paddling, the kayak does not drift, but keeps track. These are definitely ideal conditions for a relaxed and yet speedy tours, where the kayak continues to run straight even during a short break.
On small and shallow rivers we wouldn’t use the fins
On large rivers and lakes with sufficient depth and space, the two fins are a real gain. On small rivers, however, the kayak with two fins would be too little maneuverable for us. Here we would use only one fin at most. On rivers with obstacles, we would not use a fin at all, because the fin is too rigid and the risk of getting stucked or the fin breaking away is too high. This happened to us on the Aqua Marina Steam on a river tour, which has the same fins and slide-in boxes on the bottom. Other manufacturers like Gumotex have a fin attachment that allows the fin to bend to the side. With the Tomahawk, however, this is not possible, because the fin is in a fixed insertion rail.
Air pump and transport backpack (shoes, food, drink, daypack) stowed in the back
For multi-day trips, we think the Tomahawk lacks space for luggage and protection from splashing water, light rain and cold. Here, other inflatable boats are clearly ahead (e.g. Verano California Duo*, Gumotex Seawave or Rush 2, Advanced Elements Advanced Frame Convertible Elite, nortik scubi 2 XL). If you still want to take the Tomahawk on multi-day trips in summer, you should take the 3-person kayak Tomahawk Air-C 478*, which is 38 cm longer. However, it should be noted at this point that the Air-C 478 has no footrests. For use by three people, footrests are probably not even necessary. Due to the short interior space for 3 people, the front person rests his feet in the bow and the rear people against the backrest of the front paddler.
Optional thigh straps
Optional foot brace
When paddling the kayak alone, the trim on the water remains amazingly good despite the boat’s length thanks to the drop-stitch technology, so that even as a solo paddler you can make very good progress on the water in the Tomahawk Air-K 440. The maneuverability with two fins is only moderate for a 1-person kayak.
Space is more than enough for one paddler and luggage in the 1-person configuration in the Tomahawk Air-K 440. The large transport backpack can be placed in the back behind the seat. The unused D-rings can be used to attach the backpack or additional dry bags.
In the 1-person configuration, the footrest is indispensable to find sufficient support in the boat. The footrest is fine or better than nothing, but proper footrests such as with the Itiwit x500 would have been a great feature to allow the kayak to be paddled more cleanly. The aspect that the seat cushion is not attached to the floor via a Velcro strip in the 1 configuration proves to be practically uncritical.
Dismantling the boat
Dismantling the boat is quite simple. Water standing in the interior of the boat is very easy to drain through the drain holes in the stern. If the seats are wet, they must be dried in the air.
The kayak is dismantled as quickly as it is assembled. It is easy to wipe dry and put back together. If you fold it neatly, the kayak goes back into the transport backpack without any problems. The backpack is sufficiently large dimensioned to still stow the air pump or life jackets.
Drain holes in the stern
Strengths and Weaknesses
We liked the glide and straight line performance best for an inflatable kayak with a full drop stitch construction in this price range. Nevertheless, the Tomahawk does have a few weaknesses that you should be aware of before buying.
Advantages
+ spacious transport backpack included + high pressure air pump included + comfortable seats + good running characteristics and very good straight running with two fins + enough space for two large paddlers + solid workmanship + very easy and fast assembly and disassembly
Disadvantages
– moderate footrests (difficult to adjust) – seats have to dry separately and can’t be simply wiped dry – very tippy at the beginning (especially in the 2-person configuration) – directional fins break easily when touching the ground intensively – no luggage net (few stowage and fastening options for luggage) – low splash protection (no possibility to close the cockpit)
Conclusion on the Aqua Marina Tomahawk
The Aqua Marina Tomahawk is a classic full drop-stitch kayak that is ideal for half-day to day trips on calm waters in the summer. It is aimed at recreational paddlers who accept a certain tippiness in favor of better running characteristics. Due to the good gliding characteristics and the good straight running, it allows a speedy progress with comfortable paddle strokes. The solid workmanship, the slim construction and the drop-stitch chambers give the kayak a high value.
With the Tomahawk Air-K 440 on a lake in Southern Germany
Although the Aqua Marina Tomahawk Air-K 440 has a length of 4.40 m, there is little space / options for stowing or attaching luggage. A small 10 liter pack can be stowed in the front in the bow and the large transport backpack (with some content) and the air pump in the stern. For multi-day trips this would be too little. Therefore, we see the kayak primarily as a kayak for day trips.
The Gumotex Rush 2 (Innova Rush 2 for the American market) is the latest inflatable kayak with drop-stitch technology from the czech manufacturer. It is an open kayak that can be optionally equipped with a cockpit for 1 or 2 persons. In 2019 the kayak won an award for “Product of the Year” in the category Leisure and Recreation at the PADDLE EXPO. Reasons were, among others, the environmentally friendly production, the unique construction and the versatile applications. Since the beginning of 2020 the new inflatable kayak has been available. In the following article you will find our first impressions of the boat and see how it performs on lakes and rivers.
1 420 cm | 13’8” 81 cm | 2’7” 195 kg | 430 lbs 69 x 48 x 28 cm | 2’3” x 1’6” x 9”
Material: Weight: Pressure:
Nitrilon 15.5 kg | 34.2 lbs 0.25 bar | 3.6 PSI (side chambers), 0,5 bar | 7.25 PSI (floor)
Produced in:
Czech Republic
Which model has been reviewed?
Gumotex / Innova Rush 2 from 2020
How did we organize the review?
The Gumotex Rush 2 was provided to us on a rental basis by Arts-Outdoors, a store and online shop for outdoor gear. Our review is independent of the manufacturer or store and reflects our own opinion of the boat.
How intensively has the product been tested?
low
high 1 bar = 1-3 km paddled (first impressions) 2 bars = min. 1 day/ 2 half-day tours 3 bars = min. 4 tours 4 bars = min. 8 tours 5 bars = min. 12 tours (very intense)
Where have we tested the product?
Whitewater
Calm rivers
Lakes
Assembly and first impressions
The inflatable kayak comes in a waterproof 100 l transport backpack, which is comfortable to carry for short distances to the water. Compared to last year’s backpacks from Gumotex, the shoulder straps have been widened, which increases the carrying comfort. The boat itself is in an additional transport bag.
In the included backpack even the 2-person cockpit, including the cross braces, fits inside. The inflatable kayak itself weighs 15.5 kg / 34.2 lbs and the cockpit with its cross braces and coaming rings almost 3.5 kg / 7.7 lbs.
The complete paddling equipment (2 life jackets, 2 double-bladed paddles and an air pump) does not fit into the backpack. Here you will need a larger Gumotex backpack (135 L) or the Ortlieb X-Tremer (150 L). Alternatively, you can transport the accessories in an additional backpack or carrying bag.
A transport backpack is already included.
The seats and inflatable footrests are placed inside before the boat is inflated. Both elements look very well made. Typically the footrests from Gumotex have a strap in the middle for fastening. However, the footrests of the Rush have two straps on each side and so they cannot slip away to the left or right.
The seats are made of a hard foam material that makes a rather rigid impression. The seat cushion is attached to the kayak floor with a strap. The exact position can be adjusted as desired using the strap. In addition, the backrest has two straps for fastening to the side walls, which also allows the backrest to be adjusted individually.
The two foam seats of the Gumotex Rush 2.
The footrest is attached to the boat with two straps.
Also included is a fin for an improved directional stability, which can be attached to the bottom of the boat before inflating the floor chamber. The attachment of the seats, footrests and the fin was pretty straight foward.
Gumotex is actually known for its boats with bright colours. The Rush is designed in a simple grey and black. Once unfolded the kayak reminds us of the Gumotex Seawave, only that it is a little shorter. Nevertheless, we tink the length of 420 cm / 13’8” and width of 81 cm / 2’7” are really good values for a for a 2-person inflatable kayak, which also attracts demanding solo touring paddlers who wants to paddle this kayak alone.
Inserted fin
The Rush 2 is quite compact for a 2-person inflatable kayak.
The kayak is inflated within some minutes. It is best to use at least a 2×2 L double action pump so that you pump air into the chamber with each stroke. The boat has a total of three separate air chambers, which are all inflated via push-push valves. In comparison to many other Gumotex boats, Gumotex inflatable kayaks with drop-stitch bottom do not have a pressure relief valve that, for example, protects the bottom from overpressure during inflation.
What is Drop-Stitch?
With the Drop-Stitch technology, the upper and lower inner walls of the air chamber are additionally interwoven with textile threads. Only this allows a significantly higher air pressure than in air chambers without the interwoven threads. The air chamber thus achieves a very high level of dimensional stability and rigidity. The Drop-Stitch technology is very common for SUP boards (Stand Paddling Boards) and is used more and more for inflatable kayaks. Drop-Stitch has been used by American manufacturers of inflatable boats for years (e.g. Advanced Elements or Sea Eagle). Learn more about this technology in our Drop-Stitch kayak guide.
Once unfolded, the Rush 2 reminds us of the Seawave.
The Gumotex Rush 2 is best inflated with a double action pump.
The Drop-Stitch floor must be inflated up to 0.5 bar / 7.25 PSI and the side walls up to 0.25 bar / 3.6 PSI. To check the correct air pressure, we recommend an air pump with pressure gauge or a separate pressure gauge for push-push valves.
The kayak has three separate air chambers and is therefore inflated via three valves.
Capacity and space
With a maximum load limit of 195 kg / 430 lbs, the Rush has the lowest load capacity compared to other Gumotex inflatable kayaks with similar dimensions. Two heavier paddlers with luggage will very quickly reach the limits of the boat. A Gumotex Solar with similar dimensions has a load limit of 270 kg / 595 lbs.
There are three different seating positions in the kayak, so the kayak can be paddled as a 1- or 2-person kayak. There is enough legroom in both configurations. With a body height of 6’2″ cm we also have enough space in the back, and there was still plenty of space behind the back seat. Here you can place a small backpack or dry bag and fasten it with a string. If you are paddling the Rush alone, there is plenty of room to carry luggage.
The Rush 2 as a 1-person kayak.
The Rush 2 as a 1-person kayak.
Even for tall people the Gumotex Rush 2 offers enough legroom.
With the design of the hull Gumotex has made a considerable step forward. Through the intelligent use of drop-stitch elements the manufacturer has managed to create a well shaped hull in a pure inflatable kayak (without stiffening elements by means of a frame or rods). Gumotex speaks of a hydrodynamic boat shape, which means that it should glide through the water with less resistance. It comes very close to the hull of a classic fixed hull kayak. Due to the air buoyancy, however, one cannot speak of identical handling characteristics. But for a pure inflatable kayak the hull design promises better handling characteristics on the water. In addition to the fin, there is also a front keel, which is intended to have a directional stabilising effect.
In the area of the bottom valve a small bubble can appear in the drop-stitch bottom. We had noticed this when we first inflated it (see photo below). The small round bulge can look different with every inflation or even not exist at all. The second time we inflated the kayak, the spot had completely disappeared.
The reason for the bulge is that due to the construction of the valve, no threads can be attached between the upper and lower inner wall of the air chamber. This is not a manufacturing fault or quality defect, but is quite common in drop-stitch constructions.
For an inflatable kayak the Rush has a very well shaped hull. The bottom is made of drop-stitch.
The boat is made of nitrilon, which is a polyester fabric coated on both sides with rubber. We have had very good experience with this material over the last few years. We did not have to repair a single spot on our Gumotex kayaks after several uses, although our boats have had to endure quite a lot. In the end, we have certainly been lucky in one or the other situation. Nevertheless, the material cannot be compared with that of cheap inflatable kayaks, such as from Intex or Sevylor. Apart from the material used, the workmanship is also convincing, as the side and bottom chambers are glued together very cleanly.
Bow and stern are well formed by using drop stitch.
In addition, the Rush is equipped with two carrying handles at the bow and stern and a drain hole at the stern. The drain hole is practical when more water came into the boat during a white water paddling tour. It is much easier to drain the water out of the boat through the hole. Gumotex states a white water suitability of up to level 2 for the Rush. Furthermore, the Rush can be equipped with a rudder, which is especially interesting for touring paddlers.
The drain opening is located at the rear of the stern.
The optional cockpit
Gumotex offers two different cockpits as accessories for the Rush 2, which is equipped with either one or two seat hatches. Both cockpits are only available in red/black. The green/black cockpit is currently only available for the Gumotex Rush 1. Additional metal reinforcements help to hold the shape and increase the stiffness both of the cockpit and the boat itself. You have to mount these metal reinforcements before inflating the boat. After inflating the boat, attach the cockpit. Before attaching the cockpit, you have to loosen the Velcro covers on the side tubes, which is a bit force-intensive. The installation of the cockpit itself is then very easy and fits perfectly. The cockpit is placed on the Velcro strips and covered again with the Velcro covers. Thus the cockpit is fastened on both sides with Velcro. It sits very firmly on the side tubes and even in larger waves or in white water, the Velcro cover ensures that even less water gets inside the boat. A further positive side effect is that the velcro cover remains in place even when the cockpit is not in use. It also protects the velcro from dirt. The cockpit for 2 and 1 person is pretty expensive and we cannot really understand this pricing.
The cockipit features several cargo nets.
The cockpit is fastened with velcro.
1 person cockpit
Gumotex has finally improved the coaming. If you paddle in wilder waters or in the colder season with a spray skirt, you will benefit a lot from the improvement. It’s a real improvement compared to coaming from the Framura, Swing or Seawave. With the previous kayaks, the coaming ring often did not hold together, the spray skirt could only be attached with difficulty and often came off again. This works much better with the Rush, because the coaming is sewn differently and the ends of the coaming ring are connected with an angle-like coupling element. Despite the improvement it cannot be compared to the coaming of a fixed hull kayak with a neoprene skirt.
Coupling element for connecting the plastic collar reinforcement.
The coupling element holds the plastic collar reinforcement.
Another advantage of the cockpit is that it significantly increases the storage possibilities for luggage. Gumotex has used every space on the cockpit to attach cargo nets. The fine-meshed cargo nets are ideal for stowing small things of all kinds, backpacks or dry bags. At the back of the bow there is another large cargo net where you can attach a large piece of luggage. Apart from the price, the cockpit is a great accessory for the kayak.
The metal reinforcements stretch the cockpit nicely and give enough space for the feet, especially when wearing shoes.
Review of the Gumotex Rush 2 on the water
Gumotex follows the same principle with the Rush as with the Seawave. You can paddle the kayak either open or closed. The entry is very easy. Thanks to the Drop-Stitch floor, the kayak remains very stable while getting in. Thanks to the Drop-Stitch floor the kayak reminds only a little bit of a classic inflatable boat with an I-Beam floor chamber. Even with a cockpit, the seat hatches are large enough so that you don’t have to strain yourself when entering. Personally, we like a Drop-Stitch floor in the inflatable kayak very much, just because of the higher quality impression of a very firm and even kayak floor.
Thanks to the Drop-Stitch floor, entry is easy and safe.
Gumotex Rush 2 as 1-person kayak
An additional carrying handle on the side chambers would have been practical for a boat with a length of 4.2 m / 13’8″ so that it would be easier for one person to lift the kayak and put into the water. Due to the stiff floor chamber the trim of the boat on the water is very good even with one person. The speed as a 1-person kayak is good, but not outstanding. In our opinion, the Advanced Elements AdvancedFrame Convertible Elite, nortik scubi 1 XL or Itiwit x500 have better gliding characteristics.
Gumotex writes of a maximum seating comfort. The legroom is really good. The footrest and seat also give a good support when paddling. The seating comfort is good, but we cannot speak of maximum seating comfort.
Also as a 1-person kayak the Rush 2 has a very good trim on the water.
With other kayaks from Gumotex with a floor of 0.2 bar, we have often noticed during cooler seasons that the floor becomes softer after a short time. This is completely normal for inflatable boats. Compared to the side chambers, the floor has the greatest contact with the cold water, so that the air inside the chamber “contracts” and the pressure drops. This makes the chamber softer. Some people put the boat into the water and pump a few more strokes after a few minutes. The Rush does not have this problem because of the high operating pressure. Here too, the air pressure drops slightly below 0.5 bar, but this is not noticeable.
Gumotex Rush 2 as 2-person kayak
When paddling the Gumotex Rush 2 together with another person, we still had enough space and legroom (with and without cockpit). In twos we reached a speed of up to 6 kmh / 3.7 mph while paddling comfortably. Up to 5mph can be reached if both of us hit the paddles fully. Then, however, a proper bow wave forms with the hydrodynamic hull.
The Rush 2 offers enough space for two tall people (each over 1.80 m / 5’9″). As we are quite tall and make almost full use of the boat interior, the footrests are not absolutely necessary in the 2-person configuration.
The kayak offers plenty of space for two people.
When paddling comfortably, the Rush 2 reaches a speed of up to 6 kmh / 3.7 mph without problems.
The cockpit reliably protects against splash water while paddling and does not constrict the interior.
While paddling, the directional stability with fin is good for an inflatable kayak. Especially as a paddler in a boat you have the feeling that the kayak is running pretty straight. However, as an outsider in another kayak you can see that the boat swings a little to the left or right with every stroke of the paddle. This is probably due to the flat drop-stitch bottom. Here Guomtex has helped with the construction by placing a longitudinal keel on the bottom. We find the directional stability very similar to a Gumotex Solar.
When we stopped paddling, the boat drifted slightly. We had a light wind and could feel how the boat was also slightly pushed to the side. So here the Gumotex Rush behaves like other inflatable kayaks because of its air buoyancy.
The Rush 2 offers plenty of space for 2 paddlers.
On previous tours with the Gumotex Rush 2, the cargo nets of the cockpit have proven to be very practical. The middle cargo net can even hold a 40 l backpack. Due to the metal reinforcements of the cockpit the luggage does not sag, so that it could disturb the rear paddler. An additional plus point: the luggage is always accessible on the water. The fine-meshed nets (stern and middle) are ideal not only for backpacks or dry bags, but also for shoes, drinks bottles, you name it.
The middle luggage net can even hold a 40L backpack.
Dismantling the Gumotex Rush 2
For dismantling, the valve caps are unscrewed and the valve spring (red button) is pushed in. This allows most of the air to escape. We then pump out the remaining air, so that it can be folded compactly again. Of course you can also press out the remaining air when folding it.
The boat skin can be wiped dry quickly with a microfibre cloth. We have removed the metal reinforcements and left the cockpit on the boat. The kayak with the canopy fits into the transport backpack without any problems. There is also enough space for the metal reinforcements and the plastic collar reinforcement for the coaming.
When folding you put the side tubes into each other so that the boat is narrower. Then fold the boat from the tips (bow and stern) to the middle and lay the two pieces on top of each other.
Strengths and weaknesses of the Gumotex Rush 2
The Rush’s greatest strength is its versatility. The Rush 2 is both a great 1-person and a 2-person kayak. You can paddle it open or optionally with a cokcpit closed. The hull is designed and dimensioned to give it good directional stability at a reasonable speed and manoeuvrability. We see the Rush as an ideal boat for lake and river tours and paddling along quiet coastal waters. We will certainly do an extensive river tour with the Rush and report about our experiences here. Gumotex has done many things right with the Rush. It is difficult to find any weaknesses on the boat worth mentioning.
Advantages
+ attractive design + robust material + plenty of space inside + versatile + improved footrests and coaming compared to other Gumotex inflatable kayaks + high stability due to stiff kayak floor + 2 years warranty + spare parts can be re-ordered
Disadvantages
– expensive accessories (e.g. cockpit) – little splash protection without cockpit – no possibility to fix a 3rd seat (for child)
Conclusion on the Gumotex Rush 2
The Gumotex Rush is one of the most interesting new products among the portable boats on the market. In our opinion, an established manufacturer of inflatable kayaks is bringing out with the Rush exactly the boat that many paddlers wanted. We have always called the Swing 2 an all-rounder, with a clear focus on river paddling. The Rush 2 represents the role of the all-rounder even better. The weight of 15.5 kg is still within the frame and the pack size is really compact for a 2-person air kayak. The Rush 2 has almost the same dimensions as the Gumotex Solar. Many touring paddlers have missed the option of a cockpit and rudder with the Solar. With the Gumotex Rush 2, the manufacturer now satifies these expectations.
Gumotex Rush 2 with Gumotex Swing 2 in the foreground.
In addition, the handling characteristics and stability have improved thanks to the new hull shape. The Rush is aimed primarily at demanding paddlers who want to paddle different waters and a lot of distance. The Rush 2 has good handling characteristics among the inflatable kayaks. However, with the gliding characteristics of a folding and fixed hull kayak it logically does not come close. Due to the lack of the possibility of a 3rd seat, the Rush clearly distinguishes itself from the Thaya. The Thaya is the kayak for families and the Rush for touring paddlers among the Gumotex boats with high pressure floor, not to forget that the Rush 2 is the most expensive Gumotex inflatable kayak (probably due to the more complex construction). We think the price for the boat is justified, but not for the cockpit.
Alternatives to Gumotex Rush
Finally, we would like to present two alternatives to the Gumotex Rush 2. We have paddled both inflatable kayaks ourselves countless times.
Advanced Elements AdvancedFrame Convertible Elite
If the weight and drying time of an inflatable kayak is not most important to you, we recommend the AdvancedFrame Convertible Elite. We find the gliding characteristics of the AdvancedFrame Convertible Elite even better and it would be our first choice for long tours on large lakes and rivers. Furthermore, the kayak is modular. The drop-stitch floor is additionally protected by the outer boat skin. In case of a defect, the Drop-Stitch chamber can be easily replaced.
Gumotex Swing 2
If you are looking for a cheaper inflatable kayak with an integrated cockpit and want to paddle mainly rivers or small lakes, you should take a closer look at the Gumotex Swing 2. The Swing 2 already has an integrated cockpit and is, compared to the Rush 2 with cockpit, considerably lighter and almost half the price. It has a wider hull, so it is more agile but also a little slower. The material of the boat skin is identical to that of the Gumotex Rush 2.
The Advanced Elements AdvancedFrame is a closed 1-person inflatable kayak. The Californian manufacturer Advanced Elements was founded in 2007, but already produces a variety of inflatable kayaks. The AdvancedFrame is the manufacturer’s classic and is very popular and widespread among inflatable kayaks in the US. We had the opportunity to review the kayak for one season and would like to share our impressions with you.
Make sure to check out also our review on the Advanced Elements AdvancedFramce Convertible Elite kayak. This is a 2-person tandem kayak, but it can be also paddled by one person. Thanks to its length, it has a really good performance on the water.
16.3 kg | 36 lbs 0.14 bar | 2 PSI (side chambers), 0.07 bar | 1 PSI (floor)
Produced in:
Indonesia
Which model has been reviewed?
Advanced Elements AdvancedFrame with backbone (optional accessory) from 2019
How did we organize the review?
The Advanced Elements AdvancedFrame was provided to us by OutEquip, the European distributor of Advanced Elements. Our review is independent of the manufacturer or distributor and reflects our own opinion of the boat.
How intensively has the product been tested?
low
high 1 bar = 1-3 km paddled (first impressions) 2 bars = min. 1 day/ 2 half-day tours 3 bars = min. 4 tours 4 bars = min. 8 tours 5 bars = min. 12 tours (very intense)
Where have we tested the product?
Whitewater
Calm rivers
Lakes
Table of Contents
First impressions and assembly
The inflatable kayak comes with a robust carrying bag, which is not equipped with a backpack strap. This is a shame because the 16.3 kg (36 lbs) boat is not a lightweight. If you also want to transport the boat by public transport, bicycle or on foot, we recommend purchasing a spacious transport backpack. If you want to store your boat or transport it by car in the trunk, the transport bag is perfect. The Advanced Elements is quite heavy for a single inflatable kayak. Other manufacturers can do this better. In the meanwhile Advanced Elements has introduced also another model, the AdvancedFrame Ultralite, which is much lighter.
The kayak comes in a transport bag
We have reviewed the AdvancedFrame with the backbone, which is optionally available as an accessory. Independent of the backbone, the bow and the stern of the kayak are stiffened with aluminium rails, which are supposed to promise improved driving characteristics.
What does BackBone mean?
The backbone is a four-part pole that is placed between the outer skin and the floor chamber before inflation. The weight of the paddler presses the pole against the bottom of the kayak, forming the usual V-shape for solid hull kayaks, but unusual for inflatable kayaks. The hull of the boat is thus better shaped. The V-shape of the hull improves directional stability and increases speed.
Inflatable floor (included) and backbone (optional)
Kayak with backbone before assembling
The kayak has seven air chambers. That sounds a lot at first, but it’s not. For the side tubes there are two chambers, one inner and one outer. This construction gives the tube kayak even more safety, as the inner chamber is protected from the outside. If the outer chamber is damaged, you can still get to the shore safely. The third chamber is the floor, which is very quickly inflated due to the low air pressure. Then there are two air chambers or air tubes for the spray deck and the coaming rim.
The backbone is placed in the boat before inflating the floor chamber. To do this, the four-part rod is half assembled. The two poles are then put together in the boat. Placing the backbone and plugging it in is very easy and does not require a lot of effort. The air chamber of the floor is then placed on top and inflated to 0.1 bar. When inflating, it is necessary to check whether the backbone is in the middle. Even if the backbone is not completely centered, the boat still runs well in the water and deviates only very little from the track. You inflate the bottom chamber until air escapes from the pressure relief valve. Then the correct operating pressure is reached.
The ends of the backbones are placed under the air chamber
Connecting both end of the backbone
Compared to the Advanced Elements Convertible, the seat does not have a high seat cushion. This is also not necessary as the soft floor of the kayak offers sufficient seating comfort. The only disadvantage of the flat seat is that when you are in the water, you immediately sit in the wet.
The backrest is attached to the side walls by two straps with a click fastener. You can adjust the position of the backrest individually before and during the ride on the water. The seat is well made and can be placed variably in the boat. The backrest of the seat is nicely high dimensioned. Large people should attach the seat to the far back of the boat (see picture below). Air tubes are integrated underneath the spray deck so that the spray cover itself with the coaming do not hang down. Thus the spray deck gets a good form and an optional spray skirt can be stretched over it.
The seat cushion is not inflated
Under the deck and on the coaming there are more valves for inflation
The backrest is attached to the side chambers.
The boat is equipped with two directional fins, a very flat elongated fin at the bow and a short larger fin at the stern. Directional fins are essential on inflatable kayaks for good directional stability. Many inflatable kayak manufacturers offer attachable fins so that they can be removed in whitewater or very shallow water. We ride our Gumotex Swing 2 in very shallow water and whitewater without a fin. This is not possible with Advanced Elements, as they are permanently mounted. On the other hand, the fins are relatively shallow so that the risk of grounding is significantly reduced even in shallow waters. In addition, it is not completely rigid and would yield to the side if touched lightly.
Fixed fin on the bow
The stow and bow are very well-shaped
The Advanced Elements AdvancedFrame is a closed kayak, which can be closed almost watertight with a spray skirt. The emphasis is on “almost”, because the zipper in the hood is not waterproof. For small amounts of water, the grey fabric strips act as a barrier, partially covering the zipper. So the water does not flow to the zipper, but well from the hood again. For larger quantities of water (e.g. if you catch a large wave unfavourably and it sloshes over the bow, water drips into the interior afterwards). On the other hand, the zipper allows easy access to the interior, be it to place the backbone or to wipe the interior of the boat dry. We find the luggage net on the front hood very successful. This makes it possible to stow a drybag or daypack safely and easily. There is not much storage space behind the seat under the hood, there is only room for a water bottle and a lunch box.
Big cargo bungee net on the front deck for luggage
In the back there is no luggage net on the hood, but only 4 D-rings as a fixture for fastening luggage. The carrying handles are very similar to Gumotex inlatable kayaks and are very comfortable for transporting the kayak on land.
The air pump can not be completely placed under the deck at the stern
The kayak has different valves for inflation and carrying handles
We think the modular construction of the boat is very good. On the one hand it can be easily repaired in case of damage, because the floor and side chambers are exchangeable. On the other hand, it can be extended or adapted to different paddling conditions. If you paddle large and slowly flowing rivers and lakes, you can equip the boat with the backbone. If you paddle wilder rivers with possible ground contact, you only use the soft floor chamber and the boat cushions unpleasant touches with rocks and stones better.
In addition, the inflatable kayak has a paddle holder on the hood. When carrying the boat over your shoulder you can take the paddle in your hand. But if you want to rest longer on the water, the paddle holder is quite practical. After building up the inflatable kayak, you immediately notice how well the bow and stern are stiffened. AdvancedFrame owes the great pointed shape to the inner aluminium rails and inserted plastic plates.
At the tips of the kayak plastic plates are inserted to shape the ends even better
Review of the Advanced Elements AdvancedFrame on the water
The inflatable kayak can be easily carried to water on its own and used by taking it over your shoulder. Getting started is also easy and safe. If it is too tight for you, you can open the deck cover via the zipper and close it again after entering.
The AdvancedFrame is quickly ready for use
If you now sit in a kayak and start paddling, you will notice two things. First, the kayak lies stable on the water. Capsizing would be difficult. Therefore the kayak is also very suitable for beginners. The kayak has also behaved very stable on the water during waves (due to passing ships). On the other hand, we immediately liked the straight line. The kayak has good directional stability for an inflatable single kayak, compared to other inflatables of similar quality (e.g. Gumotex Swing 1 or Gumotex Twist). This allows paddling without constant correction of the direction.
The inflatable kayak lies well in the water and is very stable against tipping
The inflatable reaches a speed of over 5 km/h (3 mph) when paddling comfortably, and well over 6 km/h (3.7) when paddling quickly. These are good values for a single inflatable kayak. Nevertheless, it is noticeably slower than the Advanced Elements AdvancedFrame Convertible Elite, the 2 person version of this boat. In comparison to the 1-person version, the 2-person kayak has due to its long hull an even better directional stability and is 1-2 km/h (0.6 – 1.2 mph) faster. The manoeuvrability of the boat is good, but we have also paddled more manoeuvrable 1-person kayaks.
What’s the benefit of the BackBone?
We had tried out the boat without backbone on another paddle tour. We had expected bigger differences. Without the backbone, the inflatable kayak has a slightly poorer directional stability and is between 0.5 and 1 km/h slower (0.3 – 0.6 mph). The price of just over $90 is not justified for such a pole. Those who paddle only occasionally can do without a backbone for the time being, as the boat can also be paddled satisfactorily without this rod.
We have paddled the kayak with and without backbone
The kayak offers plenty of space and legroom (both when paddling with and without shoes) so that even tall people can paddle it. The comfort is also good. At the beginning we found the soft floor chamber to be rather inferior, as it gives way when getting in. Without the backbone, we would have wished for a much harder air floor chamber (e.g. 0.2 bar / 3 PSI). When using the backbone, however, it makes sense that the floor gives way and thus pushes the rod downwards. This is the reason why the V-shape of the hull is the first thing that happens. Unfortunately the seat is not fixed to the bottom of the kayak. A Velcro solution to fix the seat to the ground would have been nice. Nevertheless, the backrest of the seat provides enough support when paddling and has a good height. Although the floor chamber is very soft, the backbone did not pinch in any way during paddling.
For a 1-person inflatable kayak, the AdvancedFrame achieves good speed and has straight running characteristics
After several paddle tours on small and large lakes and on rivers with stone contact, the AdvancedFrame convinced us. The outer skin of the bottom is robust and thick enough to withstand unpleasant groundings. Nevertheless, we were able to detect two small, long scratches in the boat skin that we do not see as critical. None of the scratches indicates that it will lead to a hole. That speaks for a thick boat skin, which makes the boat heavier but also more robust. It’s also positive that the material hasn’t rubbed off at any point. Although we landed with the inflatable kayak on pebble beaches, the boat didn’t mind.
We didn’t try the AdvancedFrame in white water. Here we would recommend not to use the backbone. In case of strong groundings the rod does not give way and the material is fully loaded with friction. Without the backbone, the air floor cushions the “impact” much better.
The driving characteristics convinced us completely.
Dismantling the kayak
The dismantling of the inflatable kayak is very easy and fast. After paddling you open the valves and most of the air escapes by itself. The rest of the air escapes when you roll it up or can be pumped out with the air pump. The big disadvantage is the nylon material of the top and the side tube jacket. The water can be wiped off with a cloth, but the textile remains moist pretty long and has to be put out to dry at home to prevent mold.
Strengths and Weaknesses of the Advanced Elements Advanced Frame
The AdvancedElements AdvancedFrame with BackBone shines above all with its driving characteristics. For an inflatable 1-person kayak the speed and the straight line are really good. The biggest weakness is the long drying of the nylon covers of the side chambers and the spray deck. Also the boat is not a lightweight.
Winter paddling tour with the AdvancedFrame
Advantages
+ modular design and therefore easy to repair + very good speed for a 1-person inflatable kayak + very good directional stability for a 1-person inflatable kayak + generous interior, also suitable for tall people + good workmanship and robust boat skin + comfortable to sit and paddle + large and easily accessible luggage net on the bow + stable
Disadvantages
-water-permeable zippers – water-permeable zippers – long drying time due to the nylon material – high weight for a 1 person kayak – large pack size for a 1-person inflatable kayak – backbone must be purchased additionally – no foot brace
Conclusion on the Advanced Elements AdvancedFrame
The Advanced Elements AdvancedFrame is a closed inflatable kayak for beginners and demanding kayakers. We always had a lot of fun paddling the AdvancedFrame. Compared to cheap inflatables, it is superior to other kayaks in terms of riding characteristics, workmanship and equipment. Therefore, we find the price justified. If you want to kayak several times during the season, the AdvancedFrame kayak is a good choice. Especially the firm and pointed shape of the bow and stern of the kayak has made Advanced Elements really good and is unparalleled on the market. This allows the boat to cut the water better and comes very close to the driving characteristics of a solid hull kayak. If you don’t want to paddle alone, you can also buy the kayak as a 2-person version. The Advanced Elements AdvancedFrame Convertible was tested as an Elite version on our website.
The AdvancedFrame is also available as a tandem kayak
In our point of view, the AdvancedFrame is pretty heavy, compared to other single inflatable kayaks. If the weight is important because the kayak is to be transported in a backpack, we recommend the Ultralite version of the kayak. The Ultralite version is available for an extra charge of around $100. In this case the backbone cannot be used. Also the drying time should be considered before the purchase. After the paddle tour, the boat has to be partially inflate at home to dry. For those who don’t mind the high weight and the long drying time, the AdvancedFrame from Advanced Elements is a great inflatable kayak that is robust and fun to paddle.
If performance, speed and much luggage space matter to you, then please check out the 2 person kayak from Advanced Elements, which can be converted as a 1-person kayak as well.
Accessories for the Advanced Elements AdvancedFrame
Paddle, air pump and life jacket are not included. These essential accessories must be purchased separately and there are numerous accessories available for the AdvancedFrame itself. If you want to improve the performance of your boat, you can get the backbone. If you paddle in cool seasons, you can optionally purchase a spray skirt that protects you from cold and splashing water.
Life jacket: Itiwit BA 50N+ * (good life jacket for beginners, very good price-performance ratio, more details in our test report).
Dry Bag: Itiwit dry bag 10L* (ideal for protecting items from splashing water and short immersion in water, good workmanship, with carrying strap, available in different colors and sizes)
Transport backpack: only a bag is included, which is intended for storage and short transport of the kayak to the water. If you want to transport the kayak longer distances and more comfortably to the water, we recommend the Itiwit transport backpack*, which is comfortable to carry and has enough space for the kayak and accessories.
Advanced Elements is an inflatable kayak manufacturer from California and advertises with an evolution of inflatable kayaks, which is supposed to offer excellent driving characteristics through the use of patented technologies. We had the opportunity to review the AdvancedFrame Convertible Elite for an entire season.
The AdvancedFrame is the most popular inflatable kayak from Advanced Elements. The kayak is available as a 1-person and 2-persons kayak. The 1-person from Advanced Elements is a closed kayak and the 2-persons version is an open kayak. Nevertheless, the 2-person kayak can optionally be converted into a closed kayak with a deck, hence the name Convertible. The designation Elite indicates that the kayak is equipped with a drop-stitch floor. Boats without Elite come with a simple 0.1 bar (1.45 PSI) floor. Nevertheless, the simple version can also be upgraded with a backbone or a drop-stitch floor.
23.5 kg | 51.8 lbs 0.14 bar | 2 PSI (side chambers), 0.41 bar | 5.9 PSI (floor)
Produced in:
Indonesia
Which model has been reviewed?
Advanced Elements AdvancedFrame Convertible Elite from 2019
How did we organize the review?
The Advanced Elements AdvancedFrame was provided to us by OutEquip, the European distributor of Advanced Elements. Our review is independent of the manufacturer or distributor and reflects our own opinion of the boat.
How intensively has the product been tested?
low
high 1 bar = 1-3 km paddled (first impressions) 2 bars = min. 1 day/ 2 half-day tours 3 bars = min. 4 tours 4 bars = min. 8 tours 5 bars = min. 12 tours (very intense)
Where have we tested the product?
Whitewater
Calm rivers
Lakes
Set-up and first impressions
The inflatable comes with a robust and large carrying bag, which can even be carried as a backpack. It is very practical for the storage and the short transport of the boat. The shoulder straps are attached to the bag with metal carabiners. No matter how we adjusted the backpack, the karabiners pressed painfully into the shoulder. So the backpack function is almost useless. This is a pity, as the kayak is quite heavy.
The inflatable comes with a big bag
The transport backpack is uncomfortable to carry
The AdvancedFrame is folded several times. The fins are permanently mounted on the kayak.
The bottom of the boat consists of a tarpaulin polyester fabric, which according to the manufacturer is composed of 3 layers. High-priced Sevylor boats also use this material for the bottom of their inflatable kayaks. At first sight the material makes a very high quality and robust impression. Our long-term test will show how tear and abrasion resistant the material really is.
The included seats make a heavy but at the same time high-quality impression.
The AdvancedFrame Convertible Elite features two inflatable seats and a footrest for the rear paddler. The included seats look a bit bulky and heavy, which contributes to the high overall weight of the boat. Both seats have a high seat cushion. This keeps the seat of your pants dry even when there is splash water in the boat. In addition, the backrests are inflatable and have a pocket on the back for the valve tube and another for small items. The seats make an overall high-quality impression.
Transport bag, which also serves as a inflation and dry bag
After putting the boat apart you can see its length. In principle, this speaks for good driving characteristics. In addition, a removable drop-stitch floor is already in the boat, which is supplied as standard in the Elite version. A removable inner floor is very practical in any case. If the Drop-Stitch floor should break down, it can easily be replaced.
The air chambers are inflated via three valves
The drop stitch floor is separate air chamber
The AdvancedFrame has two side chambers, an inner and an outer side chamber
The inflation of the air chambers is done quite quickly with a double action air pump. The side chambers must be pumped up to 0.14 bar (2 PSI). Here the air is supplied via two separate valves, because the side walls of the boat consist of a separate inner and outer chamber. This construction gives the boat a high level of safety. On the one hand, the PVC floor and the nylon cover protect the air chambers. On the other hand, in case of damage, only the outer side chamber gets damaged. This ensures safe paddling to the next shore.
The side chambers are in nylon covers, which can be opened with zippers. If an air chamber is defective, it can be replaced. Finally, the Drop-Stitch floor is inflated to a maximum of 0.41 bar (5.9 PSI). Please make sure that the Drop-Stitch floor is centered in the bottom of the boat. At the beginning the complete assembly takes a little longer. As soon as you are trained, it will be faster and the inflatable kayak will take between 10 and 15 minutes to set up.
What is Drop-Stitch and BackBone?
With the Drop-Stitch technology, the upper and lower inner walls of the air chamber are additionally woven with nylon threads. This is the only way to achieve a significantly higher air pressure than with air chambers without the tangled nylon threads. The air chamber thus achieves very good dimensional stability and rigidity. The Drop-Stitch technology is very common for SUP boards (Stand Paddling Boards) and is used more and more for inflatable kayaks. Learn more about this type of inflatable boats, in our buyer’s guide for Drop-Stitch kayaks.
The BackBone is a multi-part rod that is placed under the air floor inside the kayak during assembly. Due to the weight of the kayaker, the BackBone is pressed against the outer wall of the boat and thus forms a V-shaped kayak hull, which is unusual for inflatable kayaks. This increases the directional stability and the speed. As a retrofit option, the BlackBone is much cheaper than the Drop-Stitch technology.
The drop-stitch floor is removable, but must be placed in the boat for inflation
The drop-stitch floor was easier to inflate than we thought
After inflation, the kayak has reached its full shape. The bottom lies very well in the kayak and is extremely firm due to the drop stitch technology. On each side chamber there are three click fasteners in which the seats can be attached. The boat can be paddled as a 2- or 1-person kayak. For the 1-person configuration, take the click fasteners in the middle.
The plastic plates are put into the pockets at the bow and stern ends
This makes the ends of the bow and stern even better shaped
In addition, there are flexible plastic plates for the stern and bow end. These are inserted into the pockets provided and thus form the ends of the kayak even better. We think it’s a great idea, because the kayak looks even stronger and higher quality by simple means.
The kayak is equipped with air chambers underneath the spray decks, which give them a better shape.
On the top of the bow is a very practical luggage net
The stern features only a device for fastening luggage or preparing for a luggage net
Although the AdvancedFrame Convertible is an open kayak, it is equipped with very generous spray covers at the bow and stern. This is practical in two ways: On the one hand, the spray covers protect against splashing water when there are waves. On the other hand, luggage can be attached to the canopy without disturbing paddling. A luggage net is already attached to the top of the bow, for example to attach a daypack comfortably and safely. On the top of the stern there is only a device in the form of four D-rings. This allows luggage to be fastened with a luggage net or cords. It would have been better if it had already been integrated.
So that the cockpit is not sagging and stretched, there are small air tubes at the front and rear on both sides to inflate. This is again a small detail, which makes the kayak higher quality.
Testing the spray deck
The zipper in the front spray deck is very practical for cleaning the boat and positioning the Drop-Stitch or BackBone correctly. But a zipper in the spray deck, which is supposed to keep water out? We tested it. Advanced Elements was aware of this and covered the zipper with grey strips. This works very well in the front area. Most of the water doesn’t flow in. In the long run, it drops a little. It becomes more problematic at the end, where the zipper is located. Here the water runs through and you get wet when paddling. If you expect waves when paddling, you should cover the zipper with removable adhesive tape (e.g. the Scotch Supreme fabric tape, compared to conventional fabric tapes, it leaves no traces of adhesive). The nylon fabric of the top, on the other hand, does not let water through.
The AdvancedFrame Convertible as a 2-person kayak
The AdvancedFrame Convertible as 1-person kayak
The seats can easily be placed in the kayak and sit firmly so that they do not slip any further. The backrest can be individually adjusted with the straps. If you want to paddle the kayak alone, place a seat in the middle of the kayak and use the middle buckles on the side walls to fix the backrest. We like this concept of a variable sitting position very much.
Paddle holder on the side chamber
Optionally, a deck can be attached via zipper
Deck for 2 person
Deck for 1 person
The inflatable kayak from Advanced Elements has many other useful features. It has carrying handles at the bow and stern, which is self-evident, but some inflatables do not have. There are even holders for the double paddles. These are especially useful when carrying the boat around, or when you want to relax on the lake in a kayak and the paddles are not needed. The boat can also be converted into a closed kayak with a cockpit. Therefore, the kayak is equipped with a zipper all around in order to mount the optionally available cockpit. Attaching the cockpit was very easy.
Transport bag, which also serves as a inflation and dry bag
Advanced Elements has attached great importance to good driving characteristics. This can be seen in the different characteristics of the boat. The keel of the bow and stern are well formed for an inflatable kayak. These reinforcements are achieved by aluminium rails inside the boat. Thus the water is cut and not “pushed in front of itself”. Not only the keels are well formed, but also the bottom of the boat. On the photo you can clearly see the smooth and flat bottom, which is formed by the inlaid Drop-Stitch floor.
In addition, the inflatable kayak has three integrated direction fins on the bottom. A very flat and elongated fin at the front and rear of the kayak and a large directional fin at the bow. All three directional fins are very flat, so grounding by the fins is unlikely and straight-line stability is improved at the same time.
Review of the AdvancedFrame Convertible Elite on the water
We could already test the boat under different conditions (e.g. on rivers in cities, big lakes with moderate wind and mountain lakes), where the boat had to endure some demands. Our experiences refer to the AdvancedFrame Convertible Elite, with drop-stitch floor.
The kayak offers enough space for the paddlers
When we first paddled the Advanced Elements AdvanceFrame on the water, we were immediately impressed by the performance. For a inflatable kayak it is very easy to paddle and we always had the feeling of moving pretty quickly. Compared to many other inflatable, the Advanced Elements forms a bow wave much later and is therefore faster and easier to paddle.
Since the Dropstitch floor can be inflated up to 0.41 bar (5.9 PSI), it does not deform when paddling. This makes paddling in the Advanced Elements kayak even more efficient. The solid floor prevents possible deformation due to the weight of the paddlers. This results in a flat and smooth underside of the kayak in the water, with significantly less water resistance. You had the feeling of sitting in a high quality solid hull kayak.
Even in windy conditions, the inflatable kayak had made a good impression, which is not a matter of course for an inflatable kayak. Because in principle inflatable kayaks are more likely to float on the water than in the water compared to solid hull and folding kayaks. The side chambers give the wind a lot of surface to attack and make paddling more difficult. We had also noticed the effect of the wind on the Advanced Elements and were slightly drifted off course depending on the wind direction. Nevertheless we were satisfied with the performance. In spite of moderate wind and rough sea we made good progress and had a speed of up to 6 km/h (3.7 mph).
Due to the long construction and the well formed hull the kayak can be paddled quickly
Compared to many other kayaks, the Advanced Elements is stable in the water. It is not quite as stable as the Gumotex Swing 2 (which in our opinion is one of the most stable inflatable kayaks), but still absolutely sufficient. On our paddle tour through Berlin the partly heavy waves of passing ships could not bring the Advanced Elements AdvancesFrame into an unstable position. We always felt safe in the boat.
The seats provide sufficient support for the paddler
Here, the kayak is equipped with a deck
The kayak offers paddlers enough legroom. So it is also suitable for tall people. However, we think it is a pity that there is no footrest for the front paddler. That’s why the front paddler has to move its seat forward so that the feet can be pushed against the inner of the bow.
The seats give a good support when paddling. The backrests are strong enough and do not bend. The seat cushion also retains its position in the boat. During longer trips, however, it can be a bit uncomfortable for the buttocks, as the seat is firmly padded and the Drop-Stitch floor is also very firm. However, we do not consider this to be a disadvantage as a paddle boat is not a sofa. If you like it more comfortable, you can use a soft seat cushion. Alternatively, the AdvancedFrame Convertible with Back-Bone instead of Drop-Stitch would be recommended in this case. There is the standard floor with 0.1 bar (1.45 PSI), which is softer and therefore gives more softness when sitting.
We also find it practical that it is very easy to adjust the backrest when paddling. We have often used this on longer trips to avoid having to sit in the same position all the time.
Solo paddling with deck
Solo paddling without deck
As a single kayak the AdvancedFrame Convertible Elite also has a good trim, so the hull is evenly distributed in the water. The driving characteristics had convinced us here as well. As a 1er the boat can be steered well and paddled quickly. In the 2-seat configuration, the front paddler is well protected against splashing water by the very generous spray deck at the bow. This advantage disappears with the 1-seat configuration, as you slide backwards considerably. Here a 1er cockpit would be recommended on longer tours. Apart from that we also find it a pity that there is no footrest, but this doesn’t bother when paddling comfortably.
The 1 person deck comes with a hatch
Under the hatch is a roll closure and gives access to the stern of the kayak
We really liked the additional deck for solo paddlers. There is a cross brace at the front of the seat hatch so that the deck does not hang down in the paddler’s foot area. The hatch closure is a good idea, and in our view the better solution to the zippers in the deck. Through the roll closure no water gets inside the boat.
We really liked the front luggage net on our paddling tours.
The luggage net also convinced us. The click closures make it easy to accommodate even large luggage. In the case we had clothes and other items of three people stowed in the carrying bag of the boat.
Dismantling the kayak
The dismantling and folding of the boat was easy. However, the kayak did not fit so loosely and easily into the supplied carrying bag. Here it helps to fold the boat without seats, footrest and drop-stitch floor and to lay into the bag. Afterwards it is much easier to store the remaining parts in the carrying bag.
However, at home the kayak has to be disassembled and inflated slightly so that the nylon covers dry properly. Especially the nylon covers of the side chambers dry badly. It is advisable to reposition or turn the tubes after some time, so that everything is dry at the end.
Dismantling the kayak is pretty easy
Strengths and Weaknesses
The good driving characteristics are definitely the greatest strength of the Advanced Elements, which it offers as a inflatable kayak. Paddling is really fun with the boat. The two biggest weaknesses of the Advanced Element are its high weight and bulky pack size. Also the long drying time through the nylon cover is a bit annoying compared to Innova and Aquaglide boats. These boats of the manufacturers can be simply wiped dry with a cloth.
Advantages
+ very good driving characteristics + spacious interior + good workmanship + plenty of well thought-out details and features + good directional stability + modular design and exchangeable side chambers and floor + boat can be extended with accessories (complete cockpit, BackBone, Drop-Stitch floor) + can also be paddled as a 1-person kayak + Increased air pressure compared to other nylon-covered inflatable kayaks
Disadvantages
– susceptible to dirt and long drying time due to nylon cover – high weight and large pack size for an inflatable – less manoeuvrable due to length – no third seat can be integrated for a child (but can sit on the floor and thus be safer) – little space at the rear for luggage – no foot brace for the front paddler – uncomfortable and tightly dimensioned transport bag
Conclusion on the Advanced Elements AdvancedFrame Convertible Elite
For an inflatable kayak, the Advanced Elements AdvancedFrame Convertible Elite has got solid hull drivinig characteristics. With its pack size and weight it belongs to the bulky and heavy inflatable kayaks. As the boat is originally designed for the American market, where the next lake will be reached by car instead of public transport, it is easy to understand why the manufacturer placed less emphasis on weight reduction. On the other hand, the boat scores in driving characteristics, comfort and equipment. With the AdvancedFrame Convertible, it is obvious that the manufacturer did not want to copy another inflatable kayak and bring it onto the market, but wanted to set itself apart from the conventional inflatable kayaks. From our point of view, the manufacturer has succeeded. The integrated aluminium rails in the bow and stern of the boat in combination with a dropstitch bottom or a backbone result in an inflatable kayak which is so unique on the market. It is really fun to paddle because it is very easy and fast. We also noticed that Advanced Elements didn’t cut corners here when it came to workmanship and equipment. The kayak is solid and has a lot of equipment.
Due to its weight, we recommend a permanent canoe cart for the Advanced Elements. If you take your car or camper and paddle accessible rivers and lakes, this aspect is of little importance to you. For those of us who mainly use public transport and like to carry a boat on our backs for more than half an hour, the inflatable kayak is less suitable. For our tests we had transported the boat in a backpack, but only the boat without any other equipment. We usually transport our Innova Swing 2 with all the equipment in a backpack and it is even lighter than the Advanced Elements. The material had made a robust impression on the tours and had to put up with a lot. Small traces of use (like small long scratches) are visible, but not further critical from our point of view. Nevertheless, we recommend paddling the boat with care and drying it properly after the tour. Then you have a great infatalbe kayak, which will give you a lot of paddling fun for many years.
We have also reviewed the Advanced Elements AdvancedFrame 1-person inftlable kayak. This is a great alternative if you are looking for a lighter and more compact kayak and if you would paddle mostly alone.
Accessory for the Advanced Elements AdvancedFrame Convertible Elite Kayak
The AdvancedFrame Convertible with cockpit.
The Advanced Elements AdvancedFrame Convertible can be equipped with a 1-person or 2-person cockpit and thus be converted into a closed kayak. We had tested it and found the installation of the cockpit very easy. Personally we found the interior a bit too narrow. Nevertheless it is a good option to protect yourself from splash water and cold in spring or autumn.